[A-00180] Javaでmicroserviceを作成する
microserviceのインフラ構築関連記事はこちら
javaとSpringを使用してmicroserviceを作成します。
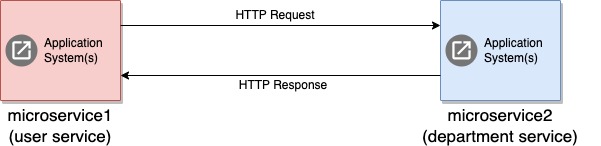
・2つのApps間communicationの構築(RestTemplate)
2つのApps(Service)間でcommunicationを行うシステムを構築します。
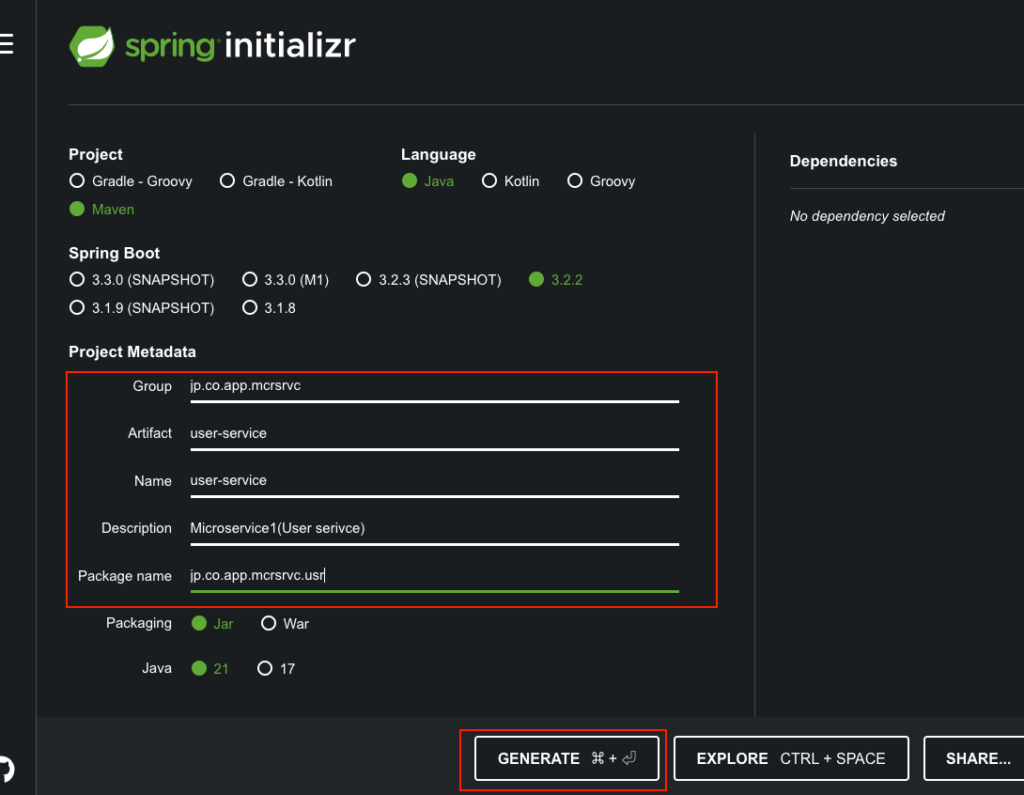
まずはspring-initializrにて各プロジェクトを作成します。
Microservice1(User service)
Microservice2(Department Service)
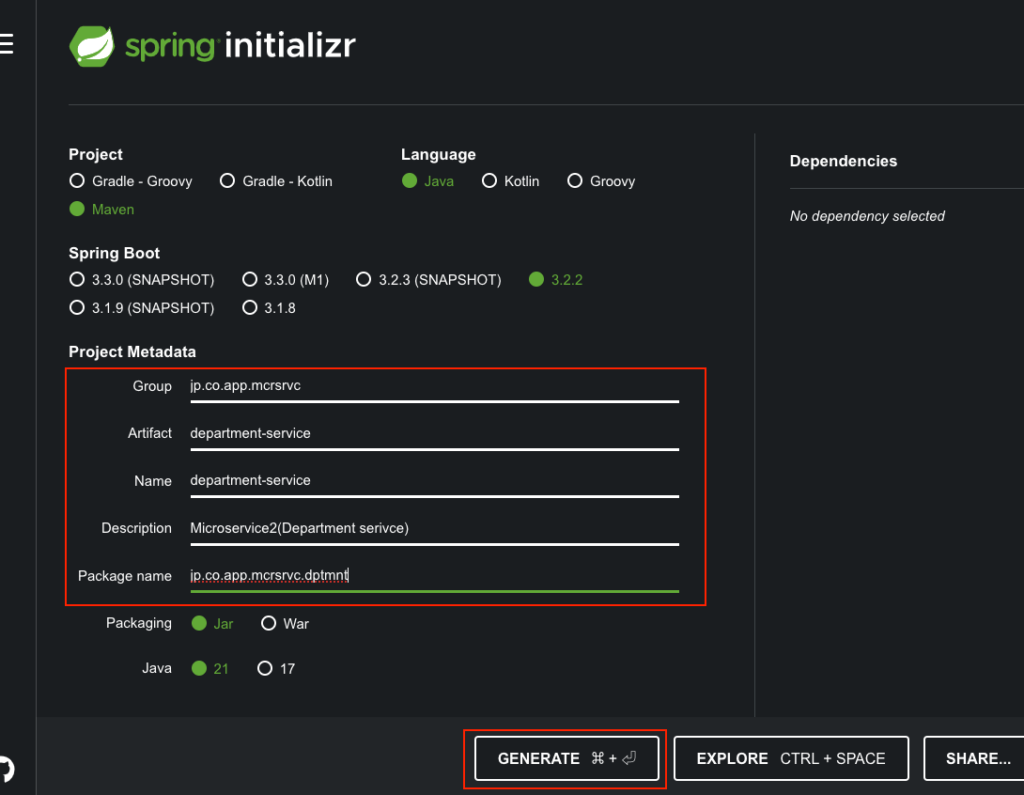
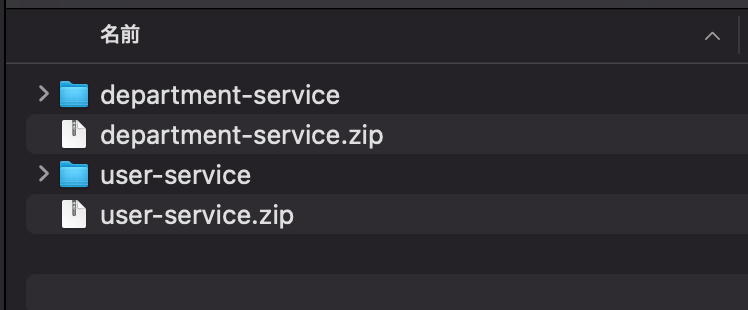
上記のプロジェクトを作成したら同じ階層のフォルダに配置します。
・Department Serviceを作成する
まずはDepartmentSerivceから作成します。
ディレクトリ構成は下記の通りです。
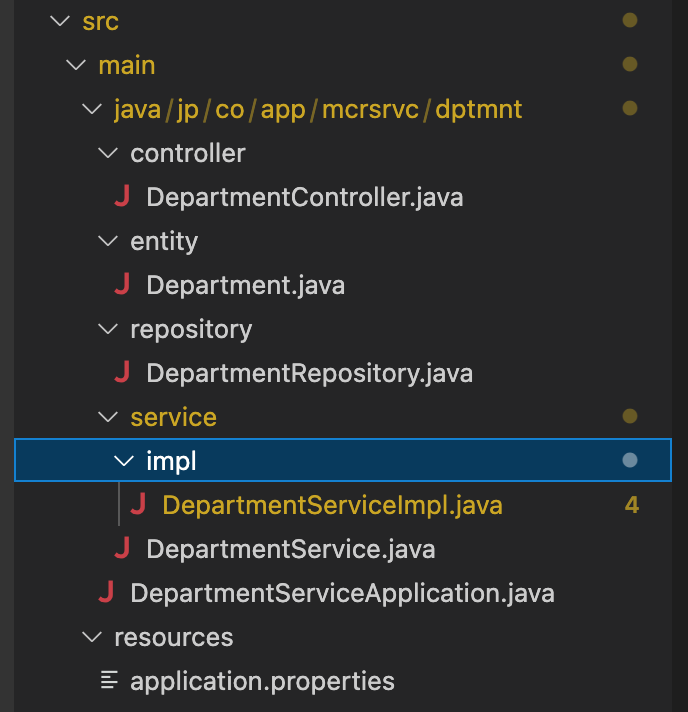
まずpom.xmlで構成を決めます。
<?xml version="1.0" encoding="UTF-8"?>
<project xmlns="http://maven.apache.org/POM/4.0.0"
	xmlns:xsi="http://www.w3.org/2001/XMLSchema-instance" xsi:schemaLocation="http://maven.apache.org/POM/4.0.0 https://maven.apache.org/xsd/maven-4.0.0.xsd">
	<modelVersion>4.0.0</modelVersion>
	<parent>
		<groupId>org.springframework.boot</groupId>
		<artifactId>spring-boot-starter-parent</artifactId>
		<version>3.2.2</version>
		<relativePath/>
		<!-- lookup parent from repository -->
	</parent>
	<groupId>jp.co.app.mcrsrvc</groupId>
	<artifactId>department-service</artifactId>
	<version>0.0.1-SNAPSHOT</version>
	<name>department-service</name>
	<description>Microservice2(Department serivce)</description>
	<properties>
		<java.version>21</java.version>
	</properties>
	<dependencies>
		<dependency>
			<groupId>org.springframework.boot</groupId>
			<artifactId>spring-boot-starter</artifactId>
		</dependency>
		<dependency>
			<groupId>org.springframework.boot</groupId>
			<artifactId>spring-boot-starter-web</artifactId>
		</dependency>
		<!-- https://mvnrepository.com/artifact/org.springframework.boot/spring-boot-starter-data-jpa -->
		<dependency>
			<groupId>org.springframework.boot</groupId>
			<artifactId>spring-boot-starter-data-jpa</artifactId>
			<version>3.2.2</version>
		</dependency>
		<!-- https://mvnrepository.com/artifact/com.mysql/mysql-connector-j -->
		<dependency>
			<groupId>com.mysql</groupId>
			<artifactId>mysql-connector-j</artifactId>
			<version>8.3.0</version>
		</dependency>
		<!-- https://mvnrepository.com/artifact/org.projectlombok/lombok -->
		<dependency>
			<groupId>org.projectlombok</groupId>
			<artifactId>lombok</artifactId>
			<version>1.18.30</version>
			<scope>provided</scope>
		</dependency>
		<!-- https://mvnrepository.com/artifact/jakarta.persistence/jakarta.persistence-api -->
		<dependency>
			<groupId>jakarta.persistence</groupId>
			<artifactId>jakarta.persistence-api</artifactId>
			<version>3.1.0</version>
		</dependency>
		<!-- https://mvnrepository.com/artifact/org.hibernate.orm/hibernate-core -->
		<dependency>
			<groupId>org.hibernate.orm</groupId>
			<artifactId>hibernate-core</artifactId>
			<version>6.4.3.Final</version>
		</dependency>

		<dependency>
			<groupId>org.springframework.boot</groupId>
			<artifactId>spring-boot-starter-test</artifactId>
			<scope>test</scope>
		</dependency>
	</dependencies>

	<build>
		<plugins>
			<plugin>
				<groupId>org.springframework.boot</groupId>
				<artifactId>spring-boot-maven-plugin</artifactId>
			</plugin>
		</plugins>
	</build>

</project>
次にapplication.propertiesにDB構成などを定義します。
spring.datasource.url=jdbc:mysql://localhost:3306/department_db
spring.datasource.username=root
spring.datasource.password=

spring.jpa.properties.hibernate.dialect=org.hibernate.dialect.MySQLDialect
spring.jpa.hibernate.ddl-auto=update

server.port=8081
上記で使用するdbは[department_db]となります。mysqlに事前にdatabaseを作成しておきます。
mysql> create database department_db;次にクラスを作成していきます。まずEntityクラスを作成します。
package jp.co.app.mcrsrvc.dptmnt.entity;

import jakarta.persistence.*;
import lombok.AllArgsConstructor;
import lombok.Data;
import lombok.NoArgsConstructor;

@Entity
@Data
@NoArgsConstructor
@AllArgsConstructor
@Table(name = "department")
public class Department {

    @Id
    @GeneratedValue(strategy = GenerationType.IDENTITY)
    private Long id;
    private String departmentName;
    private String departmentAddress;
    private String departmentCode;

}
次にリポジトリインタフェースを作成します。
package jp.co.app.mcrsrvc.dptmnt.repository;

import org.springframework.data.jpa.repository.JpaRepository;

import jp.co.app.mcrsrvc.dptmnt.entity.Department;

public interface DepartmentRepository extends JpaRepository<Department, Long> {
}
次にサービスインターフェース、サービス実装クラスを作成します。
package jp.co.app.mcrsrvc.dptmnt.service;

import jp.co.app.mcrsrvc.dptmnt.entity.Department;

public interface DepartmentService {

    Department saveDepartment(Department department);

    Department getDepartmentById(Long departmentId);
}
package jp.co.app.mcrsrvc.dptmnt.service.impl;

import org.springframework.stereotype.Service;

import jp.co.app.mcrsrvc.dptmnt.entity.Department;
import jp.co.app.mcrsrvc.dptmnt.repository.DepartmentRepository;
import jp.co.app.mcrsrvc.dptmnt.service.DepartmentService;
import lombok.AllArgsConstructor;

@Service
@AllArgsConstructor
public class DepartmentServiceImpl implements DepartmentService {

    private DepartmentRepository departmentRepository;

    @Override
    public Department saveDepartment(Department department) {
        return departmentRepository.save(department);
    }

    @Override
    public Department getDepartmentById(Long departmentId) {
        return departmentRepository.findById(departmentId).get();
    }

}
次にControllerクラスを作成します。ここがmicroservice間のcommunication部分になります。単なるREST APIです。
package jp.co.app.mcrsrvc.dptmnt.controller;

import org.springframework.web.bind.annotation.RestController;

import jp.co.app.mcrsrvc.dptmnt.entity.Department;
import jp.co.app.mcrsrvc.dptmnt.service.DepartmentService;
import lombok.AllArgsConstructor;

import org.springframework.http.HttpStatus;
import org.springframework.http.ResponseEntity;
import org.springframework.web.bind.annotation.GetMapping;
import org.springframework.web.bind.annotation.PathVariable;
import org.springframework.web.bind.annotation.PostMapping;
import org.springframework.web.bind.annotation.RequestBody;
import org.springframework.web.bind.annotation.RequestMapping;


@RestController
@RequestMapping("api/departments")
@AllArgsConstructor
public class DepartmentController {

    private DepartmentService departmentService;

    @PostMapping
    public ResponseEntity<Department> saveDepartment(@RequestBody Department department) {
        Department result = departmentService.saveDepartment(department);
        return new ResponseEntity<>(result, HttpStatus.CREATED);
    }

    @GetMapping("{id}")
    public ResponseEntity<Department> getDepartmentById(@PathVariable("id") Long departmentId) {
        Department result = departmentService.getDepartmentById(departmentId);
        return ResponseEntity.ok(result);
    }


}
最後にSpringBootのエントリポイントです。
package jp.co.app.mcrsrvc.dptmnt;

import org.springframework.boot.SpringApplication;
import org.springframework.boot.autoconfigure.SpringBootApplication;

@SpringBootApplication
public class DepartmentServiceApplication {

	public static void main(String[] args) {
		SpringApplication.run(DepartmentServiceApplication.class, args);
	}

}
上記が完成したら下記のmavenコマンドを実行し、ビルドできるかを確認します。
mvn clean install -DskipTests=trueビルドが問題なく実行できたらSpringbootを起動してみます。
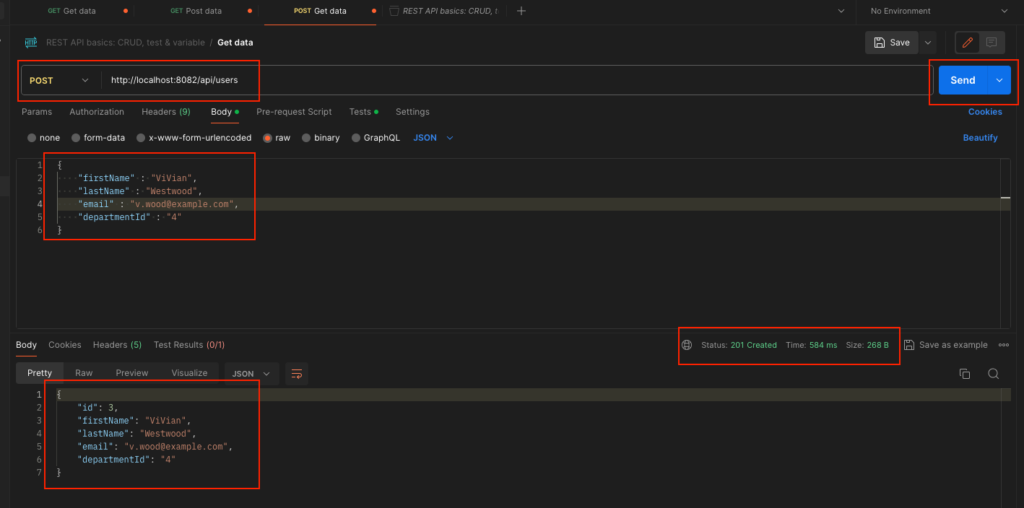
mvn spring-boot:runpostmanにてapiのテストを実行してみます。下記のキャプチャと同じようにGET,POSTでレスポンスが返って来れば実装は完了です。
キャプチャではid=4のデータをpostしてますがid=1で実行してください。
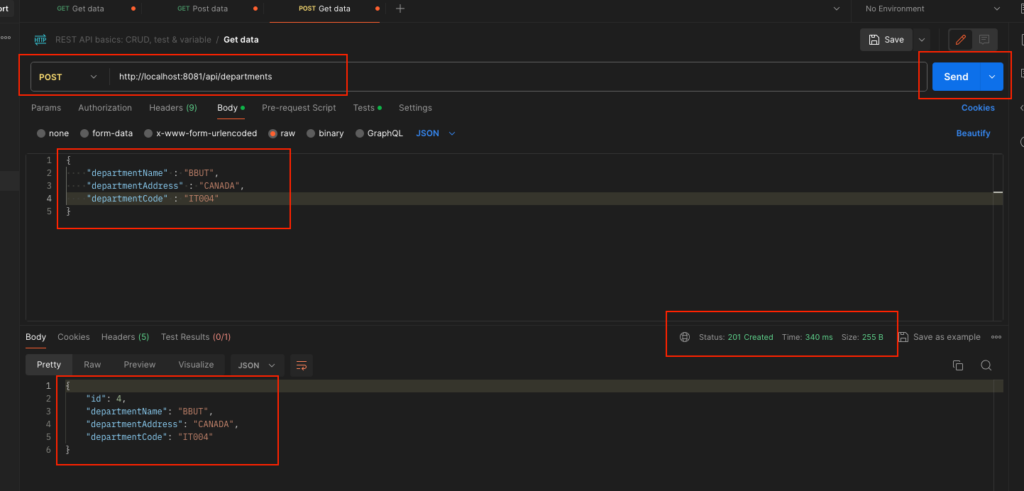
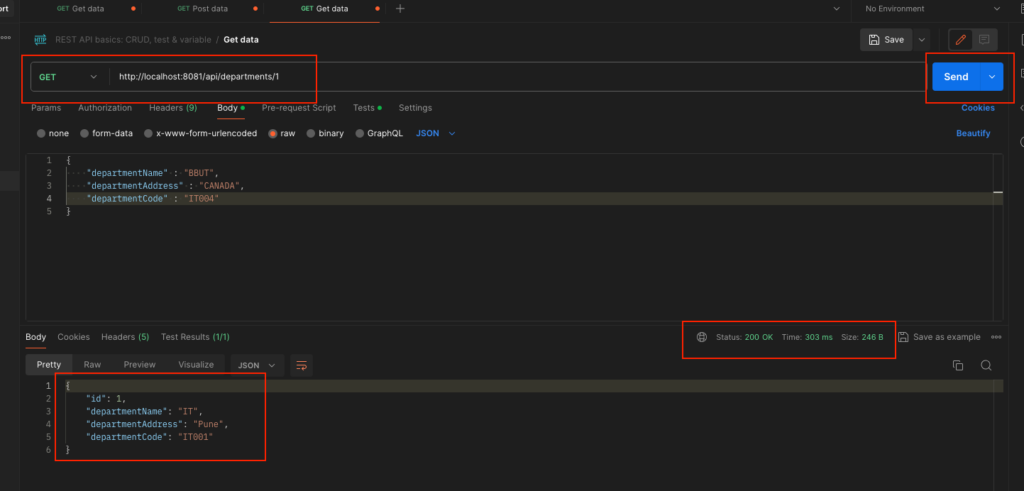
上記が確認できれば完了です。
・User Serviceを作成する
次にuser-serviceを作成します。
ディレクトリ構成は下記の通りです。
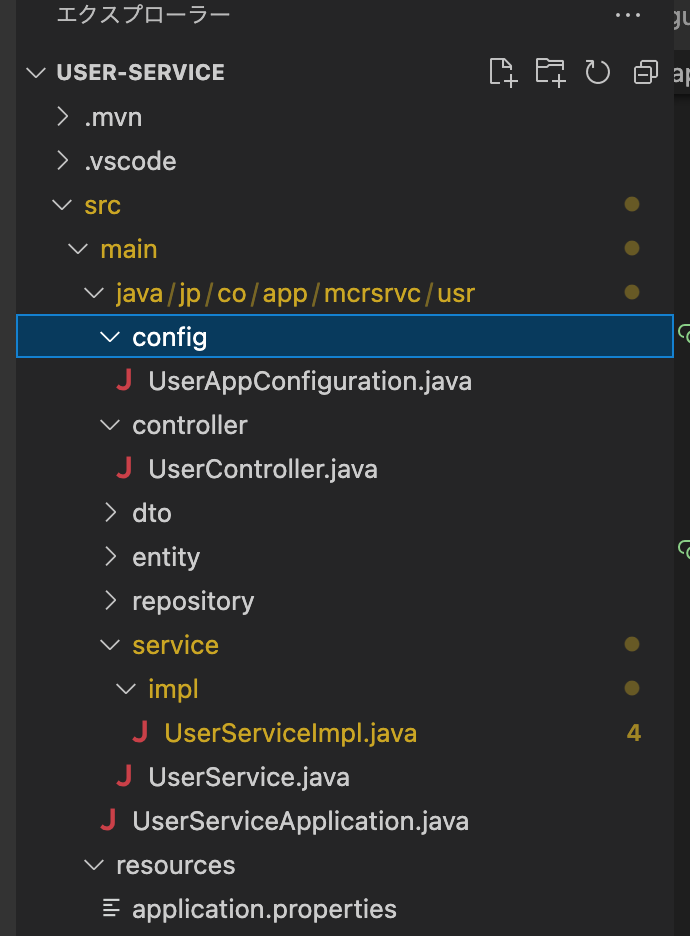
まずpom.xmlを作成します。
<?xml version="1.0" encoding="UTF-8"?>
<project xmlns="http://maven.apache.org/POM/4.0.0" xmlns:xsi="http://www.w3.org/2001/XMLSchema-instance"
	xsi:schemaLocation="http://maven.apache.org/POM/4.0.0 https://maven.apache.org/xsd/maven-4.0.0.xsd">
	<modelVersion>4.0.0</modelVersion>
	<parent>
		<groupId>org.springframework.boot</groupId>
		<artifactId>spring-boot-starter-parent</artifactId>
		<version>3.2.2</version>
		<relativePath/> <!-- lookup parent from repository -->
	</parent>
	<groupId>jp.co.app.mcrsrvc</groupId>
	<artifactId>user-service</artifactId>
	<version>0.0.1-SNAPSHOT</version>
	<name>user-service</name>
	<description>Microservice1(User serivce)</description>
	<properties>
		<java.version>21</java.version>
	</properties>
	<dependencies>
		<dependency>
			<groupId>org.springframework.boot</groupId>
			<artifactId>spring-boot-starter</artifactId>
		</dependency>
		<dependency>
			<groupId>org.springframework.boot</groupId>
			<artifactId>spring-boot-starter-web</artifactId>
		</dependency>
		<!-- https://mvnrepository.com/artifact/org.springframework.boot/spring-boot-starter-data-jpa -->
		<dependency>
			<groupId>org.springframework.boot</groupId>
			<artifactId>spring-boot-starter-data-jpa</artifactId>
			<version>3.2.2</version>
		</dependency>
		<!-- https://mvnrepository.com/artifact/com.mysql/mysql-connector-j -->
		<dependency>
			<groupId>com.mysql</groupId>
			<artifactId>mysql-connector-j</artifactId>
			<version>8.3.0</version>
		</dependency>
		<!-- https://mvnrepository.com/artifact/org.projectlombok/lombok -->
		<dependency>
			<groupId>org.projectlombok</groupId>
			<artifactId>lombok</artifactId>
			<version>1.18.30</version>
			<scope>provided</scope>
		</dependency>
		<!-- https://mvnrepository.com/artifact/jakarta.persistence/jakarta.persistence-api -->
		<dependency>
			<groupId>jakarta.persistence</groupId>
			<artifactId>jakarta.persistence-api</artifactId>
			<version>3.1.0</version>
		</dependency>
		<!-- https://mvnrepository.com/artifact/org.hibernate.orm/hibernate-core -->
		<dependency>
			<groupId>org.hibernate.orm</groupId>
			<artifactId>hibernate-core</artifactId>
			<version>6.4.3.Final</version>
		</dependency>

		<dependency>
			<groupId>org.springframework.boot</groupId>
			<artifactId>spring-boot-starter-test</artifactId>
			<scope>test</scope>
		</dependency>
	</dependencies>

	<build>
		<plugins>
			<plugin>
				<groupId>org.springframework.boot</groupId>
				<artifactId>spring-boot-maven-plugin</artifactId>
			</plugin>
		</plugins>
	</build>

</project>
次にapplication.propertiesを作成します。
spring.datasource.url=jdbc:mysql://localhost:3306/employee_db
spring.datasource.username=root
spring.datasource.password=

spring.jpa.properties.hibernate.dialect=org.hibernate.dialect.MySQLDialect
spring.jpa.hibernate.ddl-auto=update

server.port=8082
上記で定義する[employee_db]をmysqlに作成しておきます。
mysql> create database employee_db;次にentityを作成します。
package jp.co.app.mcrsrvc.usr.entity;

import jakarta.persistence.Column;
import jakarta.persistence.Entity;
import jakarta.persistence.GeneratedValue;
import jakarta.persistence.GenerationType;
import jakarta.persistence.Id;
import jakarta.persistence.Table;
import lombok.AllArgsConstructor;
import lombok.Data;
import lombok.NoArgsConstructor;

@Entity
@Table(name = "users")
@Data
@NoArgsConstructor
@AllArgsConstructor
public class User {

    @Id
    @GeneratedValue(strategy = GenerationType.IDENTITY)
    private Long id;
    private String firstName;
    private String lastName;

    @Column(nullable = false, unique = true)
    private String email;
    private String departmentId;
}
次にrepositoryインタフェースを作成します。
package jp.co.app.mcrsrvc.usr.repository;

import org.springframework.data.jpa.repository.JpaRepository;

import jp.co.app.mcrsrvc.usr.entity.User;

public interface UserRepository extends JpaRepository<User, Long> {
}
次にdtoクラスを作成します。
package jp.co.app.mcrsrvc.usr.dto;

import lombok.AllArgsConstructor;
import lombok.Data;
import lombok.NoArgsConstructor;

@Data
@NoArgsConstructor
@AllArgsConstructor
public class UserDto {
    private Long id;
    private String firstName;
    private String lastName;
    private String email;
}
package jp.co.app.mcrsrvc.usr.dto;

import lombok.AllArgsConstructor;
import lombok.Data;
import lombok.NoArgsConstructor;

@Data
@AllArgsConstructor
@NoArgsConstructor
public class DepartmentDto {
    private Long id;
    private String departmentName;
    private String departmentAddress;
    private String departmentCode;
}
package jp.co.app.mcrsrvc.usr.dto;

import lombok.AllArgsConstructor;
import lombok.Data;
import lombok.NoArgsConstructor;

@Data
@NoArgsConstructor
@AllArgsConstructor
public class ResponseDto {
    private DepartmentDto departmentDto;
    private UserDto userDto;
}
次にConfigurationクラスを作成します。application-contextと同じ意味です。
package jp.co.app.mcrsrvc.usr.config;

import org.springframework.context.annotation.Bean;
import org.springframework.context.annotation.Configuration;
import org.springframework.web.client.RestTemplate;

@Configuration
public class UserAppConfiguration {

    @Bean
    public RestTemplate restTemplate() {
        return new RestTemplate();
    }
}
次にサービスインタフェースとその実装クラスを作成します。
package jp.co.app.mcrsrvc.usr.service;

import jp.co.app.mcrsrvc.usr.dto.ResponseDto;
import jp.co.app.mcrsrvc.usr.entity.User;

public interface UserService {
    User saveUser(User user);

    ResponseDto getUser(Long userId);
}
package jp.co.app.mcrsrvc.usr.service.impl;

import org.apache.logging.slf4j.SLF4JLogger;
import org.springframework.http.ResponseEntity;
import org.springframework.stereotype.Service;
import org.springframework.web.client.RestTemplate;

import jp.co.app.mcrsrvc.usr.dto.DepartmentDto;
import jp.co.app.mcrsrvc.usr.dto.ResponseDto;
import jp.co.app.mcrsrvc.usr.dto.UserDto;
import jp.co.app.mcrsrvc.usr.entity.User;
import jp.co.app.mcrsrvc.usr.repository.UserRepository;
import jp.co.app.mcrsrvc.usr.service.UserService;
import lombok.AllArgsConstructor;
import lombok.extern.slf4j.Slf4j;

@Service
@AllArgsConstructor
@Slf4j
public class UserServiceImpl implements UserService {

    private UserRepository userRepository;

    private RestTemplate restTemplate;


    @Override
    public User saveUser(User user) {
        return userRepository.save(user);
    }

    @Override
    public ResponseDto getUser(Long userId) {
        ResponseDto responseDto = new ResponseDto();
        User user = userRepository.findById(userId).get();
        UserDto userDto = this.mapToUser(user);

        ResponseEntity<DepartmentDto> responseEntity = restTemplate.getForEntity(
            "http://localhost:8081/api/departments/" + user.getDepartmentId()
            , DepartmentDto.class);

        DepartmentDto departmentDto = responseEntity.getBody();

        System.out.println(responseEntity.getStatusCode());

        responseDto.setUserDto(userDto);
        responseDto.setDepartmentDto(departmentDto);

        return responseDto;
    }

    private UserDto mapToUser(User user) {
        UserDto userDto = new UserDto();
        userDto.setId(user.getId());
        userDto.setFirstName(user.getFirstName());
        userDto.setLastName(user.getLastName());
        userDto.setEmail(user.getEmail());
        return userDto;
    }

}
次にコントローラクラスを作成します。
package jp.co.app.mcrsrvc.usr.controller;

import org.springframework.web.bind.annotation.RestController;

import jp.co.app.mcrsrvc.usr.dto.ResponseDto;
import jp.co.app.mcrsrvc.usr.entity.User;
import jp.co.app.mcrsrvc.usr.service.UserService;
import lombok.AllArgsConstructor;

import org.springframework.http.HttpStatus;
import org.springframework.http.ResponseEntity;
import org.springframework.web.bind.annotation.GetMapping;
import org.springframework.web.bind.annotation.PathVariable;
import org.springframework.web.bind.annotation.PostMapping;
import org.springframework.web.bind.annotation.RequestBody;
import org.springframework.web.bind.annotation.RequestMapping;


@RestController
@RequestMapping("api/users")
@AllArgsConstructor
public class UserController {

    private UserService userService;

    @PostMapping
    public ResponseEntity<User> saveUser(@RequestBody User user) {
        User savedUser = this.userService.saveUser(user);
        return new ResponseEntity<>(savedUser, HttpStatus.CREATED);
    }

    @GetMapping("{id}")
    public ResponseEntity<ResponseDto> getUser(@PathVariable("id") Long userId) {
        ResponseDto responseDto = this.userService.getUser(userId);
        return ResponseEntity.ok(responseDto);
    }
}
最後にエントリーポイントとなるクラスを作成します。
package jp.co.app.mcrsrvc.usr;

import org.springframework.boot.SpringApplication;
import org.springframework.boot.autoconfigure.SpringBootApplication;

@SpringBootApplication
public class UserServiceApplication {

	public static void main(String[] args) {
		SpringApplication.run(UserServiceApplication.class, args);
	}
}
上記が完成したらビルドします。
mvn clean install -DskipTests=trueビルドが完了したらuser-service,department-serviceの両方を下記のコマンドで実行します。
mvn spring-boot:runpostmanにで実行した結果が下記となるはずです。
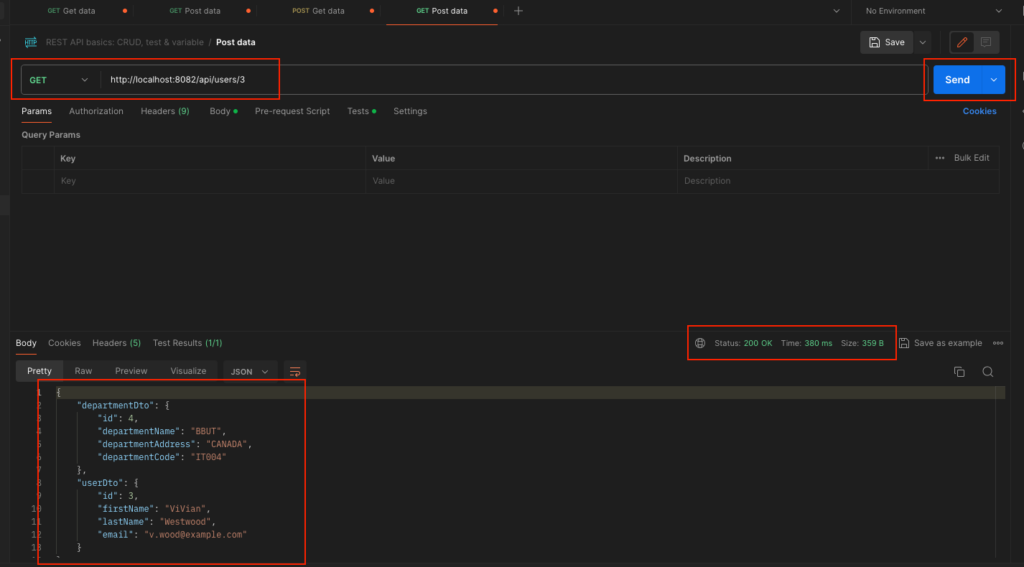
上記でservice間communicationの仕組みができました。
・Communication実装をWebClientに変更する
先ほどはRestTemplateを使用してService間のCommunicationを実装しましたが、WebClientに変更して再実装します。現在ではRestTemplateよりWebClientの使用が推奨されているようです。
user-service側の実装を修正していきます。
pom.xmlに下記の依存関係を追加します。user-serviceのpom.xmlに追加してください。
<!-- https://mvnrepository.com/artifact/org.springframework.boot/spring-boot-starter-webflux -->
<dependency>
    <groupId>org.springframework.boot</groupId>
    <artifactId>spring-boot-starter-webflux</artifactId>
    <version>3.2.2</version>
</dependency>
次にConfigurationsにwebclient用のBeanを追加します。
package jp.co.app.mcrsrvc.usr.config;

import org.springframework.context.annotation.Bean;
import org.springframework.context.annotation.Configuration;
import org.springframework.web.client.RestTemplate;
import org.springframework.web.reactive.function.client.WebClient;

@Configuration
public class UserAppConfiguration {

    @Bean
    public RestTemplate restTemplate() {
        return new RestTemplate();
    }

    @Bean
    public WebClient webClient() {
        return WebClient.builder().build();
    }
}
次にサービスレイヤーのクラスを修正します。
package jp.co.app.mcrsrvc.usr.service.impl;

import org.springframework.http.ResponseEntity;
import org.springframework.stereotype.Service;
import org.springframework.web.client.RestTemplate;
import org.springframework.web.reactive.function.client.WebClient;

import jp.co.app.mcrsrvc.usr.dto.DepartmentDto;
import jp.co.app.mcrsrvc.usr.dto.ResponseDto;
import jp.co.app.mcrsrvc.usr.dto.UserDto;
import jp.co.app.mcrsrvc.usr.entity.User;
import jp.co.app.mcrsrvc.usr.repository.UserRepository;
import jp.co.app.mcrsrvc.usr.service.UserService;
import lombok.AllArgsConstructor;

@Service
@AllArgsConstructor
public class UserServiceImpl implements UserService {

    private UserRepository userRepository;

    private RestTemplate restTemplate;

    private WebClient webClient;

    @Override
    public User saveUser(User user) {
        return userRepository.save(user);
    }

    @Override
    public ResponseDto getUser(Long userId) {
        ResponseDto responseDto = new ResponseDto();
        User user = userRepository.findById(userId).get();
        UserDto userDto = this.mapToUser(user);

        // ResponseEntity<DepartmentDto> responseEntity = restTemplate.getForEntity(
        //     "http://localhost:8081/api/departments/" + user.getDepartmentId()
        //     , DepartmentDto.class);

        DepartmentDto departmentDto = webClient.get()
        .uri("http://localhost:8081/api/departments/" + user.getDepartmentId())
        .retrieve().bodyToMono(DepartmentDto.class)
        .block();

        // DepartmentDto departmentDto = responseEntity.getBody();

        // System.out.println(responseEntity.getStatusCode());

        responseDto.setUserDto(userDto);
        responseDto.setDepartmentDto(departmentDto);

        return responseDto;
    }

    private UserDto mapToUser(User user) {
        UserDto userDto = new UserDto();
        userDto.setId(user.getId());
        userDto.setFirstName(user.getFirstName());
        userDto.setLastName(user.getLastName());
        userDto.setEmail(user.getEmail());
        return userDto;
    }

}
上記で修正は完了です。mavenビルドして動かすと下記のキャプチャの通り、RestTemplateと変わらない動作ができています。

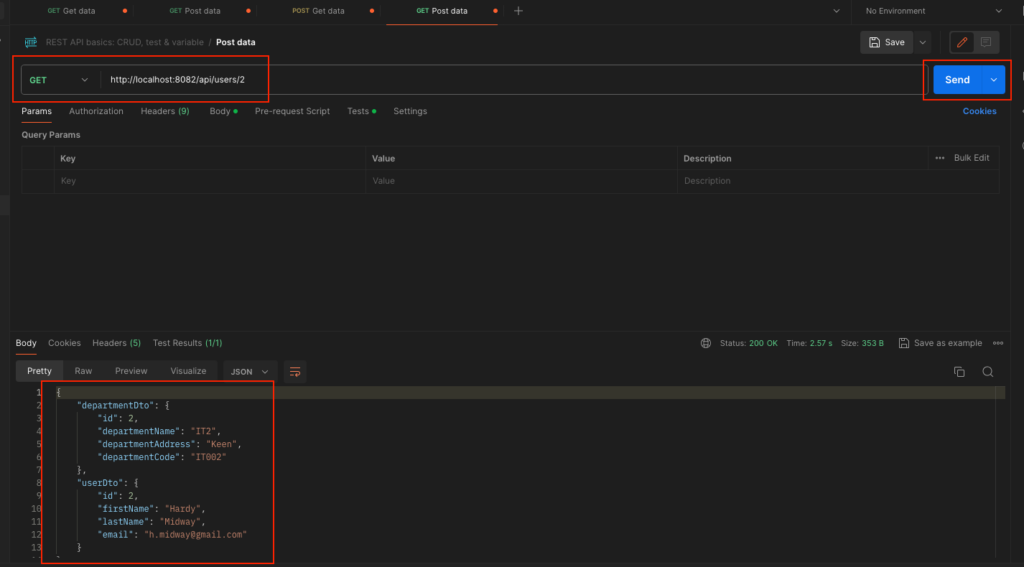
以上でWebClientによる実装は完了です。
・Spring Cloud✖️Kubernetesでmicroserviceを作ってみる
spring cloudを使用してk8sでmicroserviceを作ってみます。
・Appendix
参考ドキュメントはこちら
https://www.javaguides.net/2022/10/spring-boot-microservices-communication-using-resttemplate.html
https://www.javaguides.net/2022/10/spring-boot-microservices-communication-using-webclient.html
「[A-00180] Javaでmicroserviceを作成する」への0件のコメント