[A-00122]TerraformでGCPのCompute Enginにアプリをデプロイしてみる
Google Cloud上にTerraformを使ってCompute Engineにアプリをデプロイしてみます。
公式ページはこちら
https://cloud.google.com/docs/terraform/get-started-with-terraform?hl=ja
・Compute Engine APIを有効にする
下記のリンクより、Compute Engine APIを有効化します。
・TerraformからVMを作成
terraformから実際にVMを作成したいと思います。
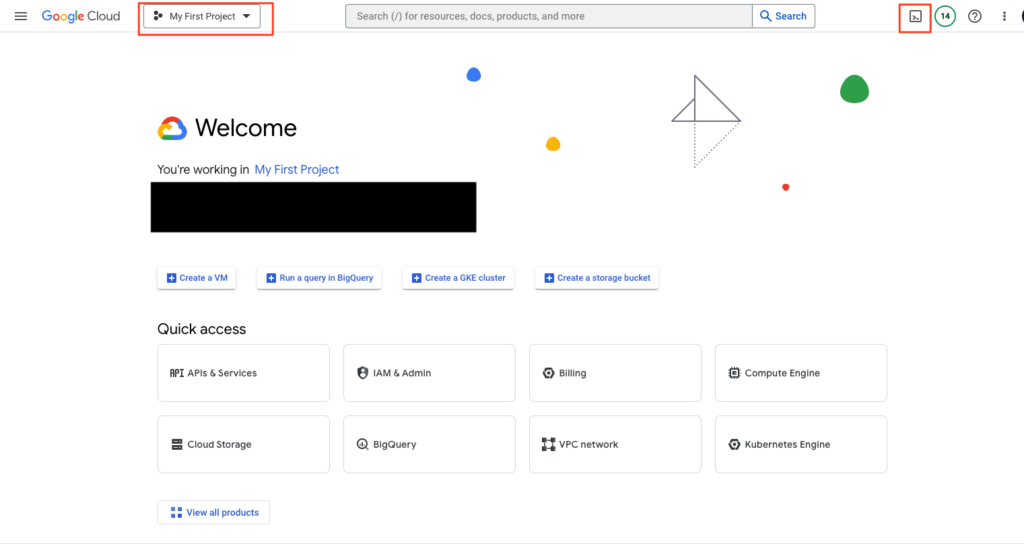
下記のキャプチャより、右上の[コンソール]ボタンを押下してCloud Shellを起動してください。また左上の[プロジェクト]プルダウンより、適当なプロジェクトを選択した状態にします。デフォルトだと「My First Project」になるはずです。
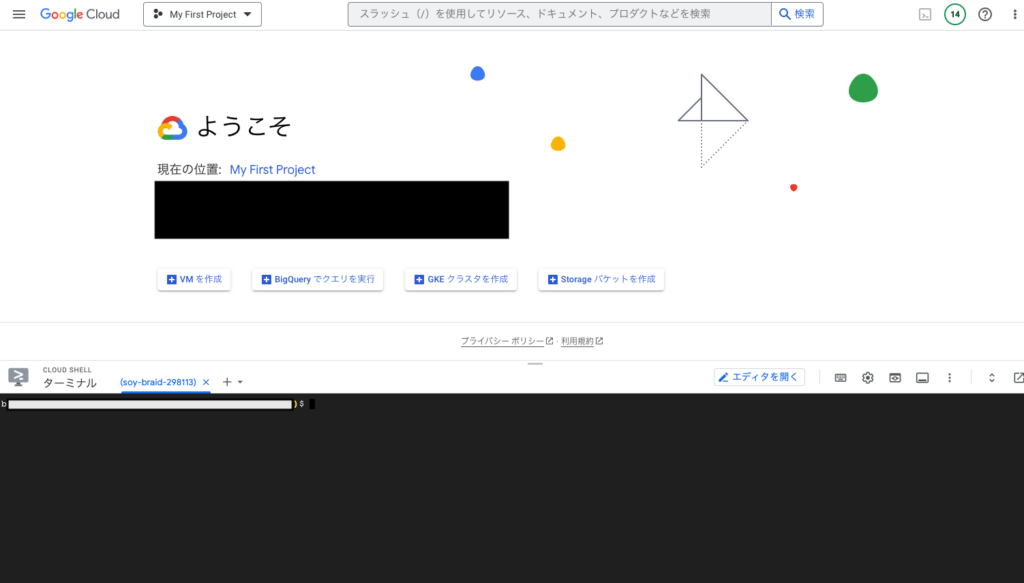
Cloud Shellを有効化すると下記のように画面下部にターミナルが表示されます。
適当なディレクトリを作成します。
mkdir tf-tutorial && tf-tutorialディレクトリ配下でTerraformファイルを作成します。
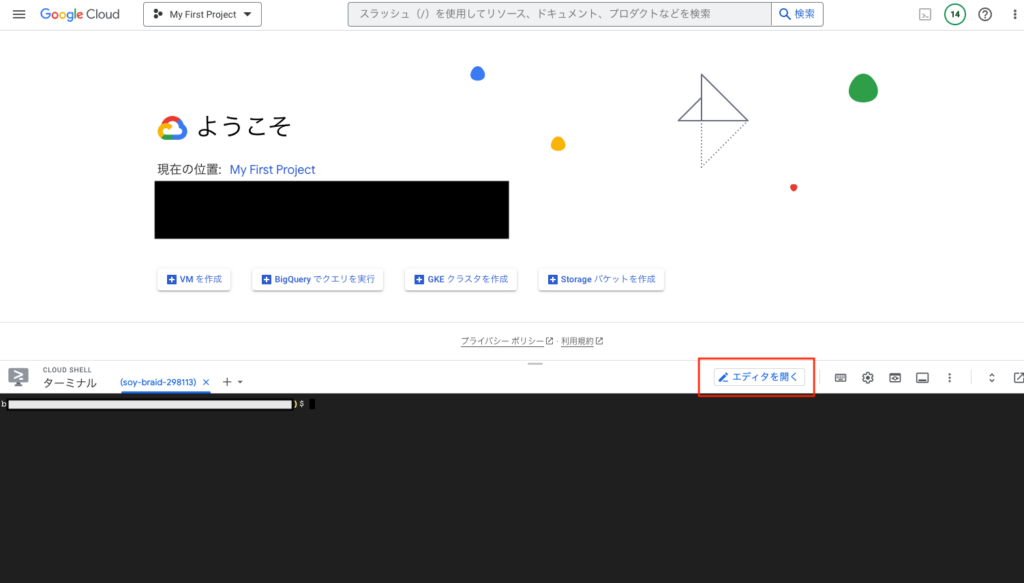
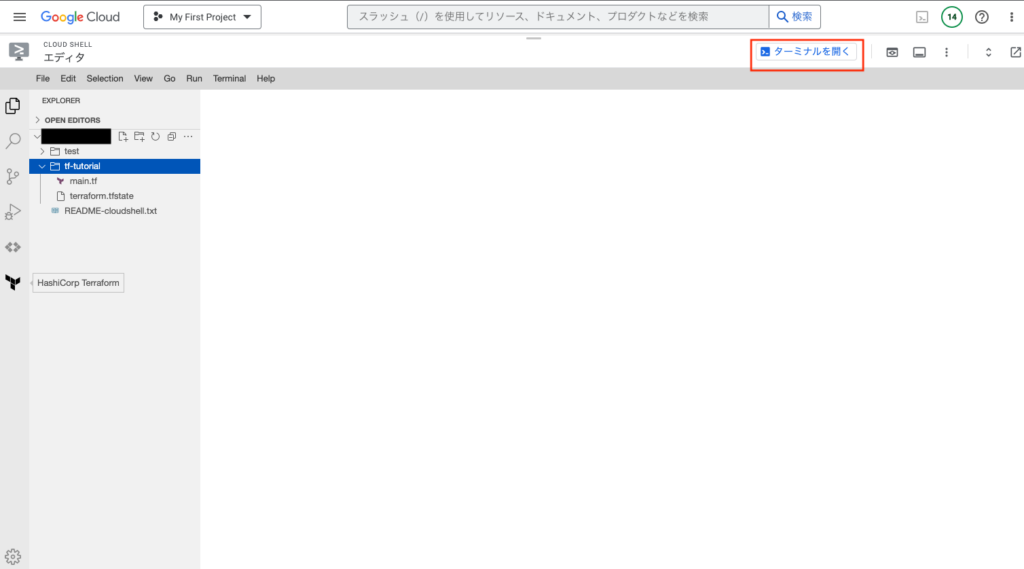
touch main.tf作成したら今度はテキストエディタを開きます。先ほどのキャプチャの画面下部の赤枠部分を押下してテキストエディタを開いきます。
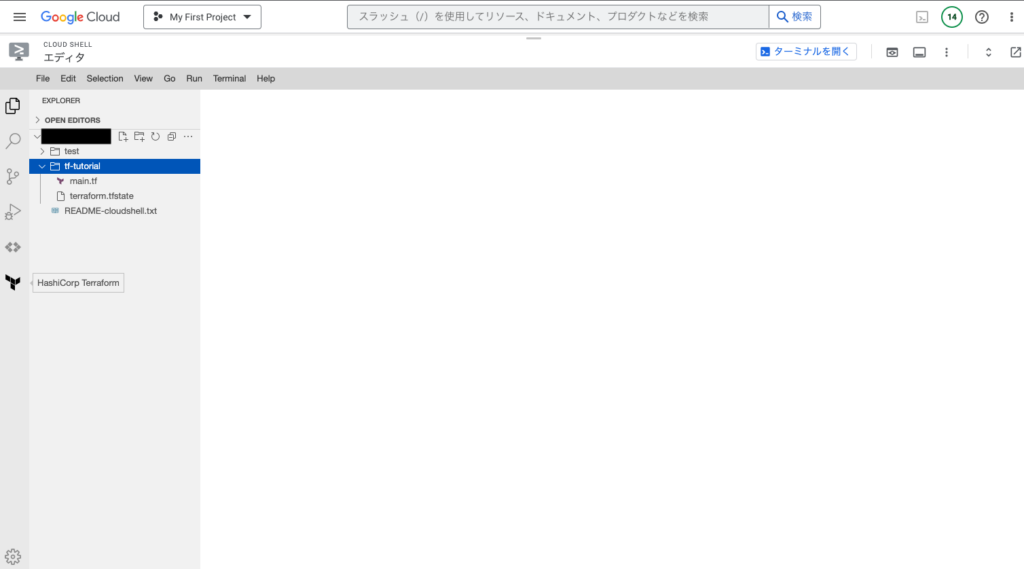
テキストエディタを開いたら下記のような画面が表示されます。
先ほど作成したmain.tfを開いて、下記のコードを記載します。
resource "google_compute_network" "vpc_network" {
  name                    = "my-custom-mode-network"
  auto_create_subnetworks = false
  mtu                     = 1460
}

resource "google_compute_subnetwork" "default" {
  name          = "my-custom-subnet"
  ip_cidr_range = "10.0.1.0/24"
  region        = "asia-northeast1"
  network       = google_compute_network.vpc_network.id
}

# Create a single Compute Engine instance
resource "google_compute_instance" "default" {
  name         = "flask-vm"
  machine_type = "e2-micro"
  zone         = "asia-northeast1-a"
  tags         = ["ssh"]

  boot_disk {
    initialize_params {
      image = "debian-cloud/debian-11"
    }
  }

  # Install Flask
  metadata_startup_script = "sudo apt-get update; sudo apt-get install -yq build-essential python3-pip rsync; pip install flask"

  network_interface {
    subnetwork = google_compute_subnetwork.default.id

    access_config {
      # Include this section to give the VM an external IP address
    }
  }
}

resource "google_compute_firewall" "ssh" {
  name = "allow-ssh"
  allow {
    ports    = ["22"]
    protocol = "tcp"
  }
  direction     = "INGRESS"
  network       = google_compute_network.vpc_network.id
  priority      = 1000
  source_ranges = ["0.0.0.0/0"]
  target_tags   = ["ssh"]
}

resource "google_compute_firewall" "flask" {
  name    = "flask-app-firewall"
  network = google_compute_network.vpc_network.id

  allow {
    protocol = "tcp"
    ports    = ["5000"]
  }
  source_ranges = ["0.0.0.0/0"]
}

// A variable for extracting the external IP address of the VM
output "Web-server-URL" {
 value = join("",["http://",google_compute_instance.default.network_interface.0.access_config.0.nat_ip,":5000"])
}
コードを記載したらCloud Shellに戻ります。画面右上の赤枠を押下します。
次にTerraformを動かしてVMインスタンスを作成していきます。
まずはTerraformを初期化します。
terraform initcloudshell:~/tf-tutorial $ terraform init
Initializing the backend...
Initializing provider plugins...
- Reusing previous version of hashicorp/google from the dependency lock file
- Using previously-installed hashicorp/google v4.78.0
Terraform has been successfully initialized!
You may now begin working with Terraform. Try running "terraform plan" to see
any changes that are required for your infrastructure. All Terraform commands
should now work.
If you ever set or change modules or backend configuration for Terraform,
rerun this command to reinitialize your working directory. If you forget, other
commands will detect it and remind you to do so if necessary.次に下記のコマンドを実行してリソースがどれくらい使用されるのかを確認します。
terraform plan@cloudshell:~/tf-tutorial $ terraform plan
Terraform used the selected providers to generate the following execution plan. Resource actions are indicated with the following symbols:
+ create
Terraform will perform the following actions:
# google_compute_firewall.flask will be created
+ resource "google_compute_firewall" "flask" {
+ creation_timestamp = (known after apply)
+ destination_ranges = (known after apply)
+ direction = (known after apply)
+ enable_logging = (known after apply)
+ id = (known after apply)
+ name = "flask-app-firewall"
+ network = (known after apply)
+ priority = 1000
+ project = (known after apply)
+ self_link = (known after apply)
+ source_ranges = [
+ "0.0.0.0/0",
]
+ allow {
+ ports = [
+ "5000",
]
+ protocol = "tcp"
}
}
............最後に下記のコマンドでデプロイします。
terraform apply途中で質問が来ますので[yes]と入力します。
cloudshell:~/tf-tutorial$ terraform apply

Terraform used the selected providers to generate the following execution plan. Resource actions are indicated with the following symbols:
  + create

Terraform will perform the following actions:

  # google_compute_firewall.flask will be created
  + resource "google_compute_firewall" "flask" {
      + creation_timestamp = (known after apply)
      + destination_ranges = (known after apply)
      + direction          = (known after apply)
      + enable_logging     = (known after apply)
      + id                 = (known after apply)
      + name               = "flask-app-firewall"
      + network            = (known after apply)
      + priority           = 1000
      + project            = (known after apply)
      + self_link          = (known after apply)
      + source_ranges      = [
          + "0.0.0.0/0",
        ]

      + allow {
          + ports    = [
              + "5000",
            ]
          + protocol = "tcp"
        }
    }

  # google_compute_firewall.ssh will be created
  + resource "google_compute_firewall" "ssh" {
      + creation_timestamp = (known after apply)
      + destination_ranges = (known after apply)
      + direction          = "INGRESS"
      + enable_logging     = (known after apply)
      + id                 = (known after apply)
      + name               = "allow-ssh"
      + network            = (known after apply)
      + priority           = 1000
      + project            = (known after apply)
      + self_link          = (known after apply)


    ........

Do you want to perform these actions?
  Terraform will perform the actions described above.
  Only 'yes' will be accepted to approve.

  Enter a value: yes

............

Apply complete! Resources: 5 added, 0 changed, 0 destroyed.

Outputs:
Web-server-URL = "http://34.84.238.143:5000"
上記でTerraformによるデプロイが完了しました。一番最後の行にある[Web-server-URL = “http://34.84.238.143:5000”]というのはこれから構築するAPPの外部アクセスURLになります。とりあえずコピーしておいてください。
・VMにAPPを構築する
次に作成されたVMに簡易なアプリケーションを立てて外部IPからアクセスしてみます。
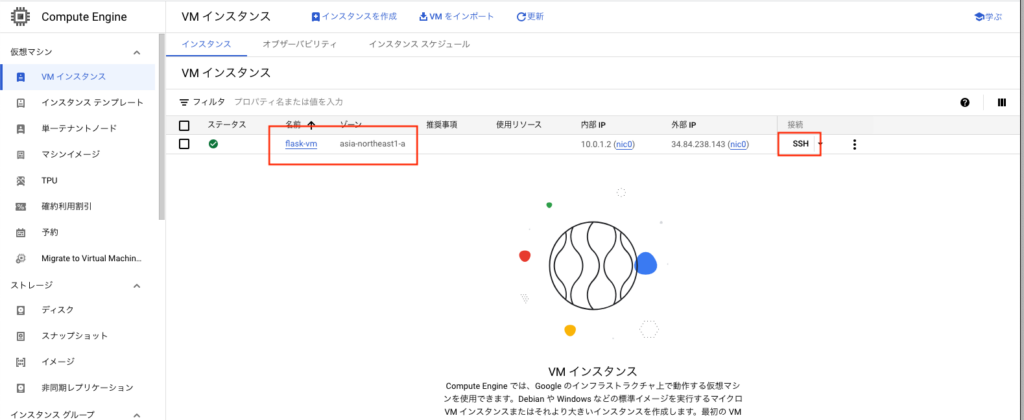
GCPのコンソールからCompute Engineを開き、下記のキャプチャのように[flask-vm]が作成されていることを確認します。次に右側にある[SSH]ボタンを押下します。
VMにSSHで接続してShellの画面になると思います。
下記のコマンドを実行してflaskをインストールします。Terraformのvmインスタンスのstartup-scriptで定義してましたがうまくインストールされてないようなのでここでも実行します。
pip install flaskflaskをインストールしたらapp.pyを作成します。
touch app.py && chmod 777 app.pyapp.pyを作成したら次にvimで開きます。開いたら下記のコードを記載します。
from flask import Flask
app = Flask(__name__)

@app.route('/')
def hello_cloud():
  return 'Hello Cloud!'

app.run(host='0.0.0.0')
保存したら下記のコマンドでapp.pyを立ち上げます。
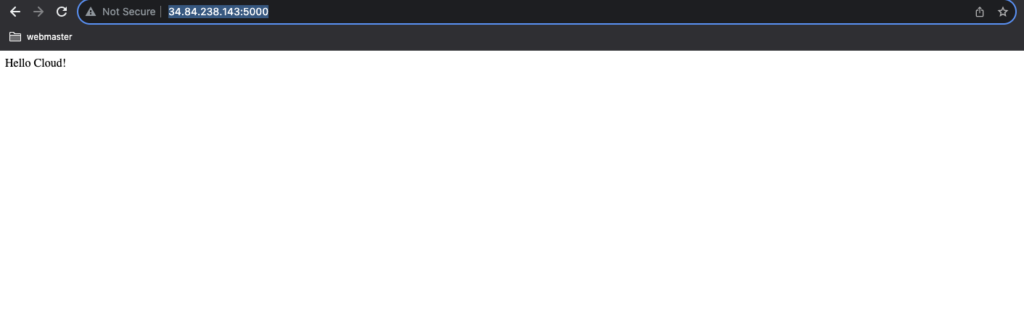
python3 app.pyflaskアプリが立ち上がったら先ほどterraformのapplyコマンドで表示されたURLにブラウザからアクセスします。
今回の場合で言うと下記のURLです。
下記の画面が表示されます。
・Terraformでリソースを削除する
APPの動作確認ができましたので今回Terraformで作成したリソースを除去します。
CloudShellの画面を表示して下記のコマンドを実行し、削除します。
terraform destroyここでも途中質問が来ますので[yes]と入力します。
cloudshell:~/tf-tutorial$ terraform destroy
google_compute_network.vpc_network: Refreshing state... [id=projects/soy-braid-298113/global/networks/my-custom-mode-network]
google_compute_firewall.ssh: Refreshing state... [id=projects/soy-braid-298113/global/firewalls/allow-ssh]
google_compute_firewall.flask: Refreshing state... [id=projects/soy-braid-298113/global/firewalls/flask-app-firewall]
google_compute_subnetwork.default: Refreshing state... [id=projects/soy-braid-298113/regions/asia-northeast1/subnetworks/my-custom-subnet]
google_compute_instance.default: Refreshing state... [id=projects/soy-braid-298113/zones/asia-northeast1-a/instances/flask-vm]

Terraform used the selected providers to generate the following execution plan. Resource actions are indicated with the following symbols:
  - destroy

Terraform will perform the following actions:
.....
Do you really want to destroy all resources?
  Terraform will destroy all your managed infrastructure, as shown above.
  There is no undo. Only 'yes' will be accepted to confirm.

  Enter a value: yes
........
Destroy complete! Resources: 5 destroyed.
以上でTerraformによるリソース作成とAPP公開までの簡単な手順です。
・もう少し複雑なAPPで動かしてみる
次にもう少し複雑なアプリを作成してGCEで動かしてみます。
下記の記事で作成したVueアプリをGCEに作成して動かしてみます。
アプリケーションが先ほどよりも大きい為、vmタイプを変更します。
resource "google_compute_network" "vpc_network" {
  name                    = "my-custom-mode-network"
  auto_create_subnetworks = false
  mtu                     = 1460
}

resource "google_compute_subnetwork" "default" {
  name          = "my-custom-subnet"
  ip_cidr_range = "10.0.1.0/24"
  region        = "asia-northeast1"
  network       = google_compute_network.vpc_network.id
}

# Create a single Compute Engine instance
resource "google_compute_instance" "default" {
  name         = "flask-vm"
  machine_type = "e2-medium"
  zone         = "asia-northeast1-a"
  tags         = ["ssh"]

  boot_disk {
    initialize_params {
      image = "ubuntu-os-cloud/ubuntu-2204-lts"
    }
  }

  # Install Flask
  metadata_startup_script = "sudo apt-get update; sudo apt-get install -yq build-essential python3-pip rsync; pip install flask"

  network_interface {
    subnetwork = google_compute_subnetwork.default.id

    access_config {
      # Include this section to give the VM an external IP address
    }
  }
}

resource "google_compute_firewall" "ssh" {
  name = "allow-ssh"
  allow {
    ports    = ["22"]
    protocol = "tcp"
  }
  direction     = "INGRESS"
  network       = google_compute_network.vpc_network.id
  priority      = 1000
  source_ranges = ["0.0.0.0/0"]
  target_tags   = ["ssh"]
}

resource "google_compute_firewall" "flask" {
  name    = "flask-app-firewall"
  network = google_compute_network.vpc_network.id

  allow {
    protocol = "tcp"
    ports    = ["5000"]
  }
  source_ranges = ["0.0.0.0/0"]
}

// A variable for extracting the external IP address of the VM
output "Web-server-URL" {
 value = join("",["http://",google_compute_instance.default.network_interface.0.access_config.0.nat_ip,":5000"])
}
上記の内容でVMを再作成します。作成が完了したらvmにSSH接続し、npmをインストールします。
sudo apt-get install -y nodejs実行後、nodeとnpmのバージョンを確認します。
@flask-vm:~$ node -v
v12.22.9
@flask-vm:~$ npm -v
8.5.1
次にnpmでvueをインストールします。また私の環境でエラーが発生した際に対応したインストールコマンドも載せておきます。
sudo npm install -g @vue/cli
sudo npm i vue@3.2.26
sudo npm i @vue/compiler-sfc
sudo npm i @vitejs/plugin-vue
次にvueコマンドから適当なプロジェクトを作成します。
sudo vue create hello-worldhello-world直下にあるvue.config.jsを編集します。
const { defineConfig } = require('@vue/cli-service')
module.exports = defineConfig({
  transpileDependencies: true,
        devServer: {
          port: 5000,
          host: '0.0.0.0'
        }
})
下記のコマンドで起動します。
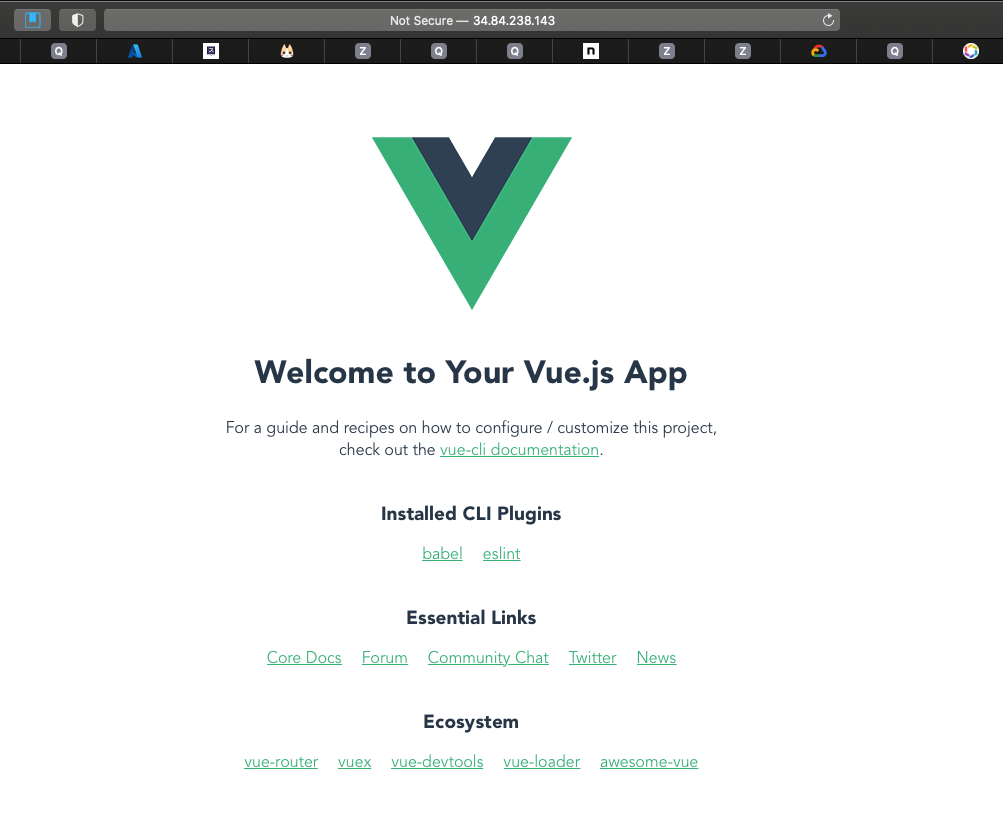
sudo npm run serveTerraformで表示したURLにアクセスすると下記のように表示されました。
上記がGCEでオリジナルアプリを公開する方法でした。
・Appendix
参考文献はこちら
https://zenn.dev/khsmty/articles/installing_the_latest_nodejs_on_ubuntu_and_debian
https://qiita.com/minicoopers0716/items/1378ceb8642e8d06870a
コメントを残す