[A-00150]Terraformでloadbalancer,Conpute Engineを組んでみる
google cloud上にterraformを使ってloadbalancerとCompute Engineの冗長構成でシステム組んでみたいと思います。
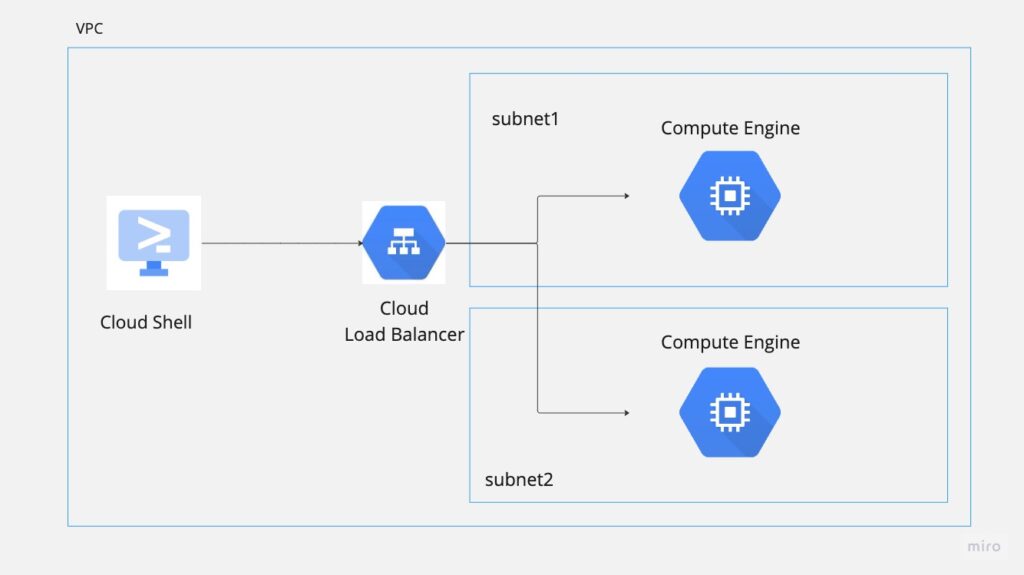
・アーキテクチャ
イメージは下記の通りです。
・Terraform作成/実行
terraform {
  required_providers {
    google = {
      source = "hashicorp/google"
      version = "4.80.0"
    }
  }
}

provider "google" {
    project = var.project_id
    region = var.region
}
# VPC
resource "google_compute_network" "vpc" {
name = "default-vpc"
auto_create_subnetworks = false
}
# SUBNET1
resource "google_compute_subnetwork" "subnet1" {
name = "subnet1"
ip_cidr_range = var.subnet1_ip
region = var.region
network = google_compute_network.vpc.id
}
# SUBNET2
resource "google_compute_subnetwork" "subnet2" {
name = "subnet2"
ip_cidr_range = var.subnet2_ip
region = var.region
network = google_compute_network.vpc.id
}
# GLOBAL IP ADDRESS
resource "google_compute_global_address" "global_address" {
name = "global-address"
}
# FORWARDING RULE
resource "google_compute_global_forwarding_rule" "forwarding_rule" {
name = "forwarding-rule"
ip_protocol = "TCP"
load_balancing_scheme = "EXTERNAL"
port_range = "80"
target = google_compute_target_http_proxy.http_proxy.id
ip_address = google_compute_global_address.global_address.id
}
# HTTP PROXY
resource "google_compute_target_http_proxy" "http_proxy" {
name = "http-proxy"
url_map = google_compute_url_map.url_map.id
}
# URL MAP
resource "google_compute_url_map" "url_map" {
name = "url-map"
default_service = google_compute_backend_service.backend_service.id
}
# BACKEND SERVICE
resource "google_compute_backend_service" "backend_service" {
name = "backend-service"
protocol = "HTTP"
port_name = "my-port"
load_balancing_scheme = "EXTERNAL"
timeout_sec = 10
enable_cdn = true
custom_request_headers = ["X-Client-Geo-Location: {client_region_subdivision}, {client_city}"]
custom_response_headers = ["X-Cache-Hit: {cdn_cache_status}"]
health_checks = [google_compute_health_check.health_check.id]
backend {
group = google_compute_instance_group_manager.mig1.instance_group
balancing_mode = "UTILIZATION"
capacity_scaler = 1.0
}
backend {
group = google_compute_instance_group_manager.mig2.instance_group
balancing_mode = "UTILIZATION"
capacity_scaler = 1.0
}
}
# INSTANCE TEMPLATE1
resource "google_compute_instance_template" "instance_template1" {
name = "instance-template1"
machine_type = "e2-micro"
tags = [ "allow-health-check" ]
network_interface {
network = google_compute_network.vpc.id
subnetwork = google_compute_subnetwork.subnet1.id
}
disk {
source_image = "debian-cloud/debian-10"
auto_delete = true
boot = true
}
lifecycle {
create_before_destroy = true
}
}
# INSTANCE TEMPLATE2
resource "google_compute_instance_template" "instance_template2" {
name = "instance-template2"
machine_type = "e2-micro"
tags = [ "allow-health-check" ]
network_interface {
network = google_compute_network.vpc.id
subnetwork = google_compute_subnetwork.subnet2.id
}
disk {
source_image = "debian-cloud/debian-10"
auto_delete = true
boot = true
}
lifecycle {
create_before_destroy = true
}
}
# MIG1
resource "google_compute_instance_group_manager" "mig1" {
name = "mig1"
zone = "asia-northeast1-a"
named_port {
name = "http"
port = 8080
}
version {
instance_template = google_compute_instance_template.instance_template1.id
name = "primary"
}
base_instance_name = "vm1"
target_size = 2
}
# MIG2
resource "google_compute_instance_group_manager" "mig2" {
name = "mig2"
zone = "asia-northeast1-a"
named_port {
name = "http"
port = 8080
}
version {
instance_template = google_compute_instance_template.instance_template2.id
name = "secondary"
}
base_instance_name = "vm2"
target_size = 2
}
# HEALTH CHECK
resource "google_compute_health_check" "health_check" {
name = "health-check"
http_health_check {
port_specification = "USE_SERVING_PORT"
}
}
# FIREWALL
resource "google_compute_firewall" "firewall" {
name = "firewall"
direction = "INGRESS"
network = google_compute_network.vpc.id
source_ranges = [ "130.211.0.0/22", "35.191.0.0/16" ]
allow {
protocol = "tcp"
}
target_tags = [ "allow-health-check" ]
}variable "project_id" {
default = <your_project_id>
}
variable "region" {
default = "asia-northeast1"
}
variable "subnet1_ip" {
default = "10.0.1.0/24"
}
variable "subnet2_ip" {
default = "10.0.2.0/24"
}上記を作成したら下記のコマンドを実行します。
terraform init
terraform plan
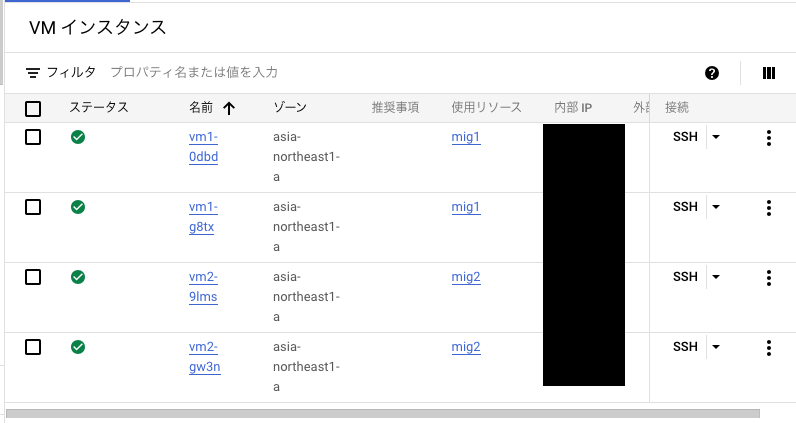
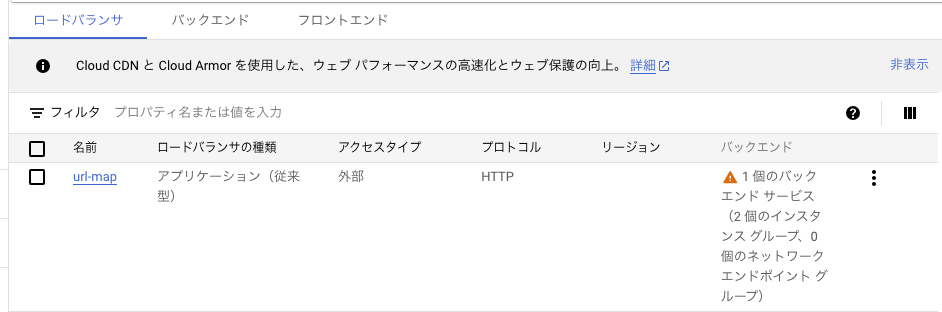
terraform apply実行後下記の通り、リソースが作成されます。
上記の確認が終わったら下記のコマンドで後片付けします。
terraform destroy・Appendix
公式ドキュメント
https://cloud.google.com/docs/terraform/best-practices-for-terraform?hl=ja
https://cloud.google.com/load-balancing/docs/https/ext-http-lb-tf-module-examples?hl=ja
https://cloud.google.com/load-balancing/docs/https/ext-https-lb-simple?hl=ja#terraform_5
参考文献
コメントを残す