[A-00196] Golang入門
go言語(golang)の入門用記事です。
・ビルドについて
基本的に下記のコマンドでビルドします
go buildクロスプラットフォームなのでexeとかも作れます。
GOOS=windows GOARCH=amd64 go build -o myapp.exeビルドキャッシュのクリアは下記のコマンド
go clean -cache・helloworldしてみる
適当なディレクトリで下記のコマンドを実行してプロジェクトを作成します。
go mod init hellogo下記のプログラムを作成します。
package main

import "fmt"

func main() {
	fmt.Println("Hello,Golang!")
}
ビルドして実行ファイルを実行します。
$ go build
$ ls
go.mod	hellogo	main.go
$ ./hellogo
Hello,Golang!
・変数の表現
変数宣言についてです。基本的にvar+変数名+型という順に書いていきます。型は省略して型推論に任せることも可能です。
package main

import "fmt"

func main() {
	fmt.Println("Hello, Go!")
	var name string = "Johnson"
	fmt.Print(name + "\n")
	var age int = 14
	fmt.Printf("%d\n", age)
	var address = "America, Mexico"
	fmt.Println(address)
	n := 100
	fmt.Println(n)
}
user@usernoMBP etcgo % go run main.go
Hello, Go!
Johnson
14
America, Mexico
100真偽値を変数に代入するには下記の記法が可能です。変数宣言しなくとも簡単に書けてしまいます。
package main

func main() {
	b := 1 != 2
	println(b)
}
user@usernoMBP etcgo % go run main.go
true論理演算は下記の通りです。&&,||,!が使えます。
package main

func main() {
	b := 1 != 2
	println(b)

	// AND
	var num int = 7
	c := num > 3 && 3 > 1
	println(c)
	// OR
	d := num > 10 || 0 < num
	println(d)
}
user@usernoMBP etcgo % go run main.go
true
true
true・定数宣言
定数宣言はconst修飾子を使います。単一での宣言、複数での宣言が使えます。
package main

import "fmt"

const john_name string = "john"
const (
	sara_age     int    = 15
	jeff_age     int    = 24
	jeff_address string = "newyork"
)

func main() {
	fmt.Println(john_name)
	fmt.Println(sara_age)
	fmt.Println(jeff_age)
	fmt.Println(jeff_address)
}
user@usernoMBP etcgo % go run main.go
john
15
24
newyork右辺を省略した記法も可能。この場合はすべて同じ値になる
package main

func main() {
	const (
		num1 = 1 + 2
		num2
		num3
	)

	println(num1, num2, num3)
}
user@usernoMBP etcgo % go run main.go
3 3 3・if分岐の使い方
package main

func main() {
	const (
		num1 = 1 + 2
		num2
		num3
	)

	println(num1, num2, num3)
	var x int = num1 + num2 + num3

	if x == num1 {
		println("x is equivalant num1")
	} else if x == num2 {
		println("x is equivalant num2")
	} else {
		println("x is not much of them")
	}
}
user@usernoMBP etcgo % go run main.go
3 3 3
x is not much of them・構造体を使ってみる
golangにはclassではなく構造体(structure)があります。
構造体を使ってプログラムを書いてみます。
まずディレクトリ構造は下記の通りです。
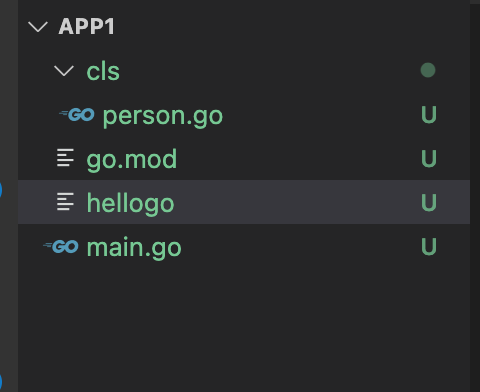
この場合、 先ほどgo mod initで定義したhellogoモジュールにclsという階層を作成したので[hellogo/cls]というのが参照先モジュールのパスになります。
package cls

import (
	"fmt"
)

type Person struct {
	Name    string
	Age     int
	Country string
}

func sayHello() {
	fmt.Println("Who am I?")
}
package main

import (
	"fmt"
	"hellogo/cls"
)

func main() {
	fmt.Println("Hello,Golang!")

	p := cls.Person{Name: "satoshi", Age: 14, Country: "Japan"}
	p.Name = "satoshi"
	p.Age = 14
	p.Country = "Japan"
	fmt.Println(p.Name)
	fmt.Println(p.Age)
	fmt.Println(p.Country)
}
上記を実行すると下記の通りとなります。
$ go run main.go
Hello,Golang!
satoshi
14
Japan
・コンストラクタと関数を作成してみる
先ほど作成したPerson構造体にコンストラクタっぽい関数とコンソールに文字列出力するだけの関数を作成します。
package cls

import (
	"fmt"
	"strconv"
)

type Person struct {
	name    string
	age     int
	country string
}

func NewInstance(name string, age int, country string) *Person {
	p := new(Person)
	p.name = name
	p.age = age
	p.country = country

	return p
}

func (p Person) SayHello() {
	fmt.Println("Who am I?")
	fmt.Println("My name is" + p.name + ".")
	fmt.Println("I'm " + strconv.Itoa(p.age) + " years old.")
	fmt.Println("I'm live in " + p.country + ".")
}
package main

import (
	"fmt"
	"hellogo/cls"
)

func main() {
	fmt.Println("Hello,Golang!")

	p := cls.NewInstance("satoshi", 14, "Japan")
	p.SayHello()
}
ビルドして実行します。
$ go run main.go
Hello,Golang!
Who am I?
My name issatoshi.
I'm 14 years old.
I'm live in Japan.
・TestCodeを書いてみる
ユニットテストの作成について学習する
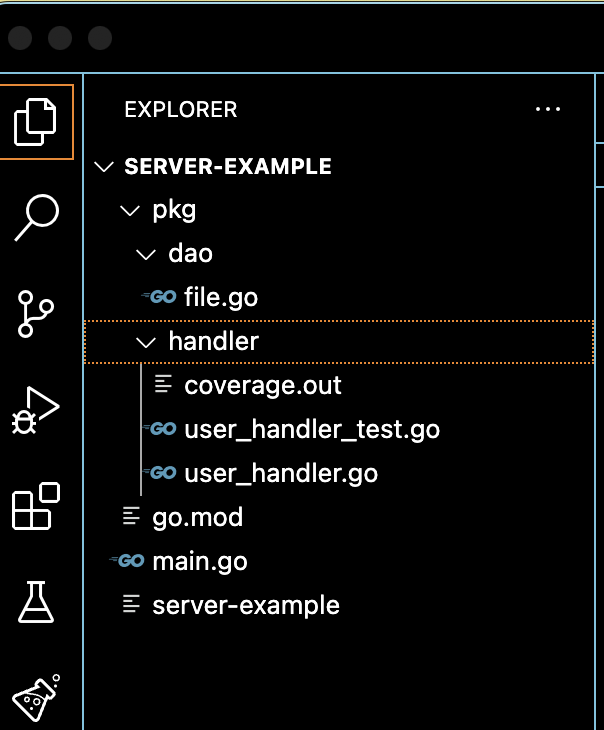
pkg/handler/user_handler.goを作成する
package handler

import (
	"fmt"
)

type User struct {
	Name string
	Age  int
}

func (u *User) GetMessage(message string) string {
	return fmt.Sprintf("%s(%d) san, %s", u.Name, u.Age, message)
}
テストコードを自動生成します。

package handler

import "testing"

func TestUser_GetMessage(t *testing.T) {
	type fields struct {
		Name string
		Age  int
	}
	type args struct {
		message string
	}
	tests := []struct {
		name   string
		fields fields
		args   args
		want   string
	}{
                // ここを追加
		{"Test1", fields{Name: "Johnson", Age: 32}, args{"Nice to meet you."}, "Johnson(32) san, Nice to meet you."},
	}
	for _, tt := range tests {
		t.Run(tt.name, func(t *testing.T) {
			u := &User{
				Name: tt.fields.Name,
				Age:  tt.fields.Age,
			}
			if got := u.GetMessage(tt.args.message); got != tt.want {
				t.Errorf("User.GetMessage() = %v, want %v", got, tt.want)
			}
		})
	}
}
上記の「ここを追加」とコメントの記載のある箇所は自作する必要がある箇所です。
下記のコマンドを実行するとテスト結果が得られます。
user@usernoMBP server-example % cd pkg/handler
user@usernoMBP handler % go test
PASS
ok      server-example/pkg/handler      0.343s
カバレッジを取る場合は下記のコマンドを実行します。
go test -v -cover -coverprofile=coverage.out -covermode=setuser@usernoMBP handler % go test -v -cover -coverprofile=coverage.out -covermode=set
=== RUN TestUser_GetMessage
=== RUN TestUser_GetMessage/Test1
--- PASS: TestUser_GetMessage (0.00s)
--- PASS: TestUser_GetMessage/Test1 (0.00s)
PASS
coverage: 100.0% of statements
ok server-example/pkg/handler 0.320s出力したcoverage.outをhtmlで表示します。
go tool cover -html=coverage.out 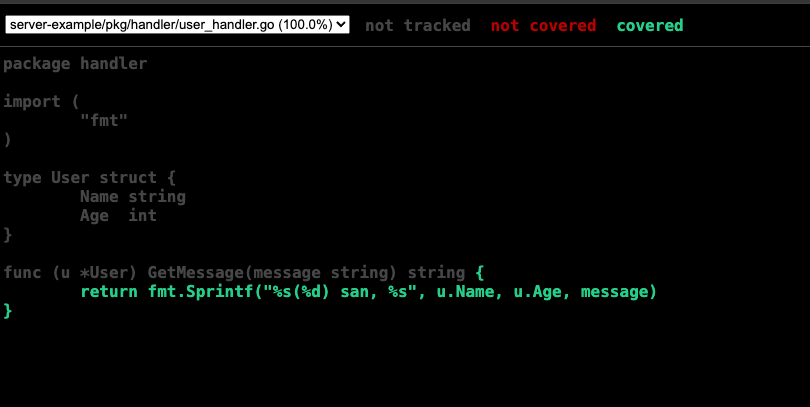
・Httpサーバーを作成する
httpサーバーを作成して簡単なrestAPIを作成してみます。
package main

import (
	"fmt"
	"net/http"
)

func printWelcome(w http.ResponseWriter, r *http.Request) {
	fmt.Fprint(w, "welcome to my channel")
}

func printHello(w http.ResponseWriter, r *http.Request) {
	fmt.Fprint(w, "Hello,world")
}

func main() {
	server := http.Server{
		Addr:    ":8080",
		Handler: nil,
	}

	http.HandleFunc("/welcome", printWelcome)
	http.HandleFunc("/hello", printHello)

	server.ListenAndServe()
}
下記コマンドにて実行します。
go build
./http-server
別ウィンドウでterminalからcurlにてリクエストします。
Last login: Sun Aug 11 00:06:00 on ttys000
user@usernoMBP ~ % curl http://localhost:8080/hello
Hello,world%                                                                                                                                                              user@usernoMBP ~ % curl http://localhost:8080/welcome
welcome to my channel%
次にhandlerを作成してみます。
package main

import (
	"fmt"
	"net/http"
)

type WelcomeHandler struct{}

func (h *WelcomeHandler) ServeHTTP(w http.ResponseWriter, r *http.Request) {
	fmt.Fprint(w, "welcome to my channel")
}

func main() {

	handler := WelcomeHandler{}

	server := http.Server{
		Addr:    ":8080",
		Handler: &handler,
	}

	server.ListenAndServe()
}
上記を起動して先ほどと同様にcurlします。しかしurlは適当で良いです。パスを何にしても同じ値が返ってきます。
user@usernoMBP ~ % curl http://localhost:8080/welcome
welcome to my channel%                                                                                                                                                    user@usernoMBP ~ % curl http://localhost:8080
welcome to my channel%                                                                                                                                                    user@usernoMBP ~ % curl http://localhost:8080/hhh
welcome to my channel%
handlerにそれぞれエンドポイントを持たせて出力させてみます。
複数のhandlerを登録してエンドポイントを複数用意して作成してみます。
package main

import (
	"fmt"
	"net/http"
)

type WelcomeHandler struct{}
type HelloHandler struct{}

func (wh *WelcomeHandler) ServeHTTP(w http.ResponseWriter, r *http.Request) {
	fmt.Fprint(w, "welcome to my channel")
}

func (hh *HelloHandler) ServeHTTP(w http.ResponseWriter, r *http.Request) {
	fmt.Fprint(w, "Hello,world")
}

func main() {

	wh := WelcomeHandler{}
	hh := HelloHandler{}

	server := http.Server{
		Addr:    ":8080",
		Handler: nil,
	}

	http.Handle("/welcome", &wh)
	http.Handle("/hello", &hh)

	server.ListenAndServe()
}
実行すると下記のようになります。
user@usernoMBP ~ % curl http://localhost:8080/welcome
welcome to my channel%                                                                                                                                                    user@usernoMBP ~ % curl http://localhost:8080/hello
Hello,world%
・Rest APIを作成する。
Gorm,Ginを使ってRestAPIを作成します。下記のパッケージをインストールします。
※実行はプロジェクト直下でしてください。go.modに指定したパッケージが追加されます。
go get -u github.com/gin-gonic/gin
go get -u gorm.io/gorm
go get -u gorm.io/driver/mysql
・RESTAPI(GETのみ)を作る
簡単なサーバーを作ります。
go mod init simple-server
go get github.com/gorilla/context@latest
go get github.com/gorilla/mux@latest
package main
import (
"context"
"log"
"net/http"
"os"
"os/signal"
"syscall"
"time"
"github.com/gorilla/mux"
)
func handler(w http.ResponseWriter, r *http.Request) {
query := r.URL.Query()
name := query.Get("name")
log.Printf("Received request for %s\n", name)
w.Write([]byte(CreateGreeting(name)))
}
func CreateGreeting(name string) string {
if name == "" {
name = "Guest"
}
return "Hello, " + name + "!\n"
}
func main() {
r := mux.NewRouter()
r.HandleFunc("/", handler)
svr := &http.Server{
Handler: r,
Addr: ":8080",
ReadTimeout: 10 * time.Second,
WriteTimeout: 10 * time.Second,
}
go func() {
log.Println("Starting Server")
if err := svr.ListenAndServe(); err != nil {
log.Fatal(err)
}
}()
waitForShutdown(svr)
}
func waitForShutdown(srv *http.Server) {
interruptChan := make(chan os.Signal, 1)
signal.Notify(interruptChan, os.Interrupt, syscall.SIGINT, syscall.SIGTERM)
<-interruptChan
ctx, cancel := context.WithTimeout(context.Background(), time.Second*10)
defer cancel()
srv.Shutdown(ctx)
log.Println("Shutting down")
os.Exit(0)
}package main
import "testing"
func TestGreetingSpecific(t *testing.T) {
greeting := CreateGreeting("John")
if greeting != "Hello, John!\n" {
t.Errorf("Greeting was incorrect, got: %s, want %s.", greeting, "Hello, John!\n")
}
}
func TestGreetingDefault(t *testing.T) {
greeting := CreateGreeting("")
if greeting != "Hello, Guest!\n" {
t.Errorf("Greeting was incorrect, got: %s, want: %s.", greeting, "Hello, Guest!\n")
}
}Dockerにデプロイします。
FROM golang:alpine3.21

WORKDIR /app

COPY . .

RUN go build -o myapp

EXPOSE 8080

CMD ["./myapp"]
docker build -t simple-server .
docker run -it --detach --publish 8080:8080 --name simple-server simple-servercurl -G -d "name=tanaka" http://localhost:8080/
curl http://localhost:8080/下記のようになります。
user@usernoMBP simple-server % curl -G -d "name=sasaki" http://localhost:8080/
Hello, sasaki!
・Appendix
参考文献はこちら
https://qiita.com/Sekky0905/items/10c8ae9cee719d66fa84
https://qiita.com/quicksort/items/c9522793a941edf074fd
https://zenn.dev/logica0419/articles/understanding-go-interface
https://qiita.com/Soleiyu/items/a799ac3d0da5e75f7b57
https://qiita.com/zurazurataicho/items/4a95e0daf0d960cfc2f7
https://qiita.com/S-Masakatsu/items/6fb8e765cd443e2edd7f
https://github.com/hunter32292/go-server-example
https://note.com/rescuenow_hr/n/n9ed7caf4646d
https://qiita.com/BitterBamboo/items/6119f7986a04c5a0ac57
https://zenn.dev/jboy_blog/articles/7eff1d6346f9df
https://note.com/webdrawer/n/nfb66bb34ac68
https://zenn.dev/yoonchulkoh/articles/9729d9e1304738
https://qiita.com/soicchi/items/2637a9195e64fdc73609
https://github.com/golang-standards/project-layout?tab=readme-ov-file
コメントを残す