[A-00206] Spring Journey(Java)
spring frameworkをジャーニーする記事です。
とりあえずいろんなspringの機能を使って色々作ってみたいと思います。
・RestAPIを設計する
OpenAPI Specificationを作成してRestAPIを設計しましょう
とりあえず下記の内容で作成しました。手始めのAPIなので簡単かつ適当に作りました。
openapi: 3.0.3
info:
  title: "Person Information API"
  version: "1.0.0"
servers:
  - url: http://localhost:8080
paths:
  /api/person/{id}:
    get:
      summary: Get a person info by ID
      parameters:
        - in: path
          name: id
          schema:
            type: integer
          required: true
          description: Numeric ID of the person to get
      tags:
        - person
      operationId: getPerson
・RestAPIを作成する
とりあえずrest-apiをspringbootで作成してみます。
まずGetメソッドを作ります。Personモデルを返すコントローラを作成します。
package com.example.rest.api.cotroller;

import org.springframework.web.bind.annotation.GetMapping;
import org.springframework.web.bind.annotation.PathVariable;
import org.springframework.web.bind.annotation.RequestMapping;
import org.springframework.web.bind.annotation.RestController;

import com.example.rest.api.model.Person;

@RestController
@RequestMapping(value="/api/person")
public class RestSvcPersonController {

    @GetMapping("/{id}")
    public Person getPerson(@PathVariable int id) {
        // TODO 後ほどcoreサービスを作成する
        Person p = new Person();
        p.setId(1);
        p.setName("Satoshi Tajima");
        p.setAge(14);
        p.setCountry("Japan");
        return p;
    }
}
package com.example.rest.api.model;

import lombok.Data;

@Data
public class Person {

    private int id;
    private String name;
    private int age;
    private String country;
}
<?xml version="1.0" encoding="UTF-8"?>
<project xmlns="http://maven.apache.org/POM/4.0.0" xmlns:xsi="http://www.w3.org/2001/XMLSchema-instance"
	xsi:schemaLocation="http://maven.apache.org/POM/4.0.0 https://maven.apache.org/xsd/maven-4.0.0.xsd">
	<modelVersion>4.0.0</modelVersion>
	<parent>
		<groupId>org.springframework.boot</groupId>
		<artifactId>spring-boot-starter-parent</artifactId>
		<version>3.3.1</version>
		<relativePath/> <!-- lookup parent from repository -->
	</parent>
	<groupId>com.example.rest.api</groupId>
	<artifactId>demo-rest-api</artifactId>
	<version>0.0.1-SNAPSHOT</version>
	<name>demo-rest-api</name>
	<description>Demo project for Spring Boot</description>
	<url/>
	<licenses>
		<license/>
	</licenses>
	<developers>
		<developer/>
	</developers>
	<scm>
		<connection/>
		<developerConnection/>
		<tag/>
		<url/>
	</scm>
	<properties>
		<java.version>21</java.version>
	</properties>
	<dependencies>
		<dependency>
			<groupId>org.springframework.boot</groupId>
			<artifactId>spring-boot-starter</artifactId>
		</dependency>
		<dependency>
			<groupId>org.springframework.boot</groupId>
			<artifactId>spring-boot-starter-web</artifactId>
		</dependency>
		<dependency>
			<groupId>org.projectlombok</groupId>
			<artifactId>lombok</artifactId>
			<version>1.18.32</version>
			<scope>provided</scope>
		</dependency>
		<dependency>
			<groupId>org.springframework.boot</groupId>
			<artifactId>spring-boot-starter-test</artifactId>
			<scope>test</scope>
		</dependency>
	</dependencies>

	<build>
		<plugins>
			<plugin>
				<groupId>org.springframework.boot</groupId>
				<artifactId>spring-boot-maven-plugin</artifactId>
			</plugin>
		</plugins>
	</build>

</project>
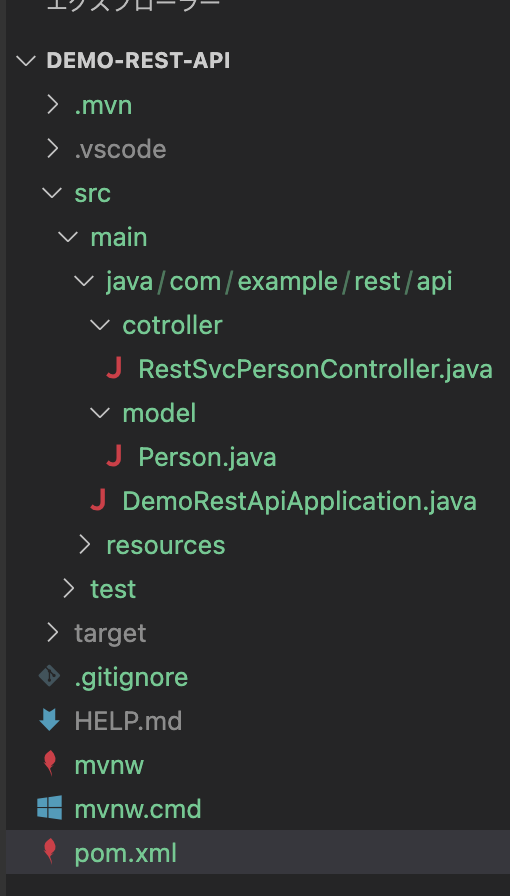
ディレクトリ構成は下記のようにしてます。
mavenビルドして起動します。
mvn clean install
java -jar target/demo-rest-api-0.0.1-SNAPSHOT.jar
実行できたらcurlを実行してGetリクエストします。下記のようにJSONが返ってきたら成功です。
$ curl -X GET http://localhost:8080/api/person/1
{"id":1,"name":"Satoshi Tajima","age":14,"country":"Japan"}
・Dockerで動かしてみる
次にデプロイするためのDockerfileを作成します。Dockerを用いて下記のようなイメージでSpringBootを動かします。

FROM openjdk:21

WORKDIR /usr/src/myapp

COPY target/demo-rest-api-0.0.1-SNAPSHOT.jar app.jar

EXPOSE 8080

ENTRYPOINT ["java","-jar","app.jar"]
docker build -t hello-app-java .docker run -it --rm --publish 8080:8080 --name my-running-app hello-app-java上記を実行すると、ローカルの8080ポートにフォワードされますので同じようにlocalhost:8080にリクエストを飛ばすと同じ結果が返ってきます。
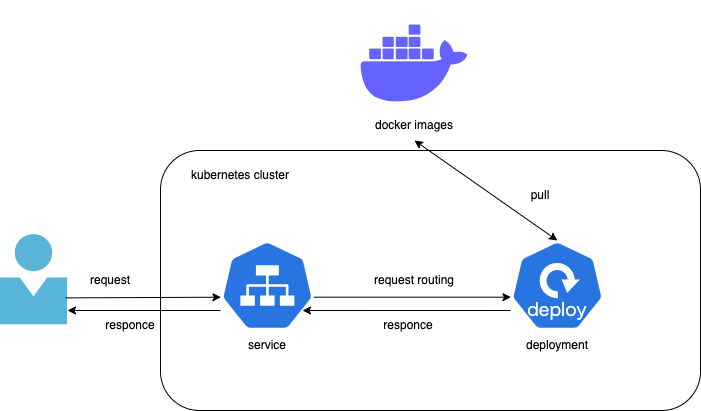
・Kubernetesで動かしてみる
ローカルからkubernetesのservice,deploymentにアクセスしてrestapiにリクエストしたいので下記のyamlファイルを作成します。kubernetesクラスターのアーキテクチャは下記の通りです
apiVersion: v1
kind: Service
metadata:
  name: hello-java-app-service
spec:
  type: LoadBalancer
  selector:
    app: app
  ports:
  - port: 80
    targetPort: 8080
---
apiVersion: apps/v1
kind: Deployment
metadata:
  name: app
spec:
  replicas: 1
  selector:
    matchLabels:
      app: app
  template:
    metadata:
      labels:
        app: app
    spec:
      containers:
      - name: app
        image: hello-app-java
        imagePullPolicy: IfNotPresent
        ports:
        - containerPort: 8080
下記のコマンドを実行します。
kubectl apply -f k8s-deployment.ymlkubernetesのservice,deploymentを確認します。
$ kubectl get pods,services,deployments
NAME                         READY   STATUS    RESTARTS      AGE
pod/app-5df45cbb69-hwxk7     1/1     Running   0             18m
pod/httpd-58f4986b-sjwjw     1/1     Running   3             56d
pod/nginx-58fdfc99cd-zz9kr   1/1     Running   2 (39m ago)   56d

NAME                             TYPE           CLUSTER-IP       EXTERNAL-IP   PORT(S)        AGE
service/hello-java-app-service   LoadBalancer   10.106.199.164   localhost     80:30713/TCP   18m
service/httpd-svc                ClusterIP      10.111.22.101    <none>        8090/TCP       56d
service/kubernetes               ClusterIP      10.96.0.1        <none>        443/TCP        275d
service/nginx-svc                ClusterIP      10.102.32.169    <none>        8080/TCP       56d

NAME                    READY   UP-TO-DATE   AVAILABLE   AGE
deployment.apps/app     1/1     1            1           18m
deployment.apps/httpd   1/1     1            1           56d
deployment.apps/nginx   1/1     1            1           56d
localhost:80に対してリクエストを実行すると下記のように動きます。
$ curl localhost:80/api/person/1
{"id":1,"name":"Satoshi Tajima","age":14,"country":"Japan"}
・Microservice構築(Registration and Discovery)
MicroserviceにおけるService Registry, Service Discoveryを学習する
まずEurekaサーバーを作成します。
<?xml version="1.0" encoding="UTF-8"?>
<project xmlns="http://maven.apache.org/POM/4.0.0"
	xmlns:xsi="http://www.w3.org/2001/XMLSchema-instance" xsi:schemaLocation="http://maven.apache.org/POM/4.0.0 https://maven.apache.org/xsd/maven-4.0.0.xsd">
	<modelVersion>4.0.0</modelVersion>
	<parent>
		<groupId>org.springframework.boot</groupId>
		<artifactId>spring-boot-starter-parent</artifactId>
		<version>3.3.4</version>
		<relativePath/> <!-- lookup parent from repository -->
	</parent>
	<groupId>com.example.ms</groupId>
	<artifactId>eureka</artifactId>
	<version>0.0.1-SNAPSHOT</version>
	<name>eureka</name>
	<description>Demo project for Spring Boot Microservice</description>

	<properties>
		<java.version>17</java.version>
	</properties>

	<dependencyManagement>
		<dependencies>
			<dependency>
				<groupId>org.springframework.cloud</groupId>
				<artifactId>spring-cloud-dependencies</artifactId>
				<version>2023.0.3</version>
				<type>pom</type>
				<scope>import</scope>
			</dependency>
		</dependencies>
	</dependencyManagement>


	<dependencies>
		<dependency>
			<groupId>org.springframework.cloud</groupId>
			<artifactId>spring-cloud-starter-netflix-eureka-server</artifactId>
		</dependency>
	</dependencies>

	<build>
		<plugins>
			<plugin>
				<groupId>org.springframework.boot</groupId>
				<artifactId>spring-boot-maven-plugin</artifactId>
			</plugin>
		</plugins>
	</build>

</project>
package com.example.ms;
import org.springframework.boot.SpringApplication;
import org.springframework.boot.autoconfigure.SpringBootApplication;
import org.springframework.cloud.netflix.eureka.server.EnableEurekaServer;
@SpringBootApplication
@EnableEurekaServer
public class EurekaMicroserviceApplication {
public static void main(String[] args) {
SpringApplication.run(EurekaMicroserviceApplication.class, args);
}
}spring:
application:
name: eureka-server
server:
port: 8761
eureka:
client:
register-with-eureka: false
fetch-registry: false
logging:
level:
com.netflix.eureka: OFF
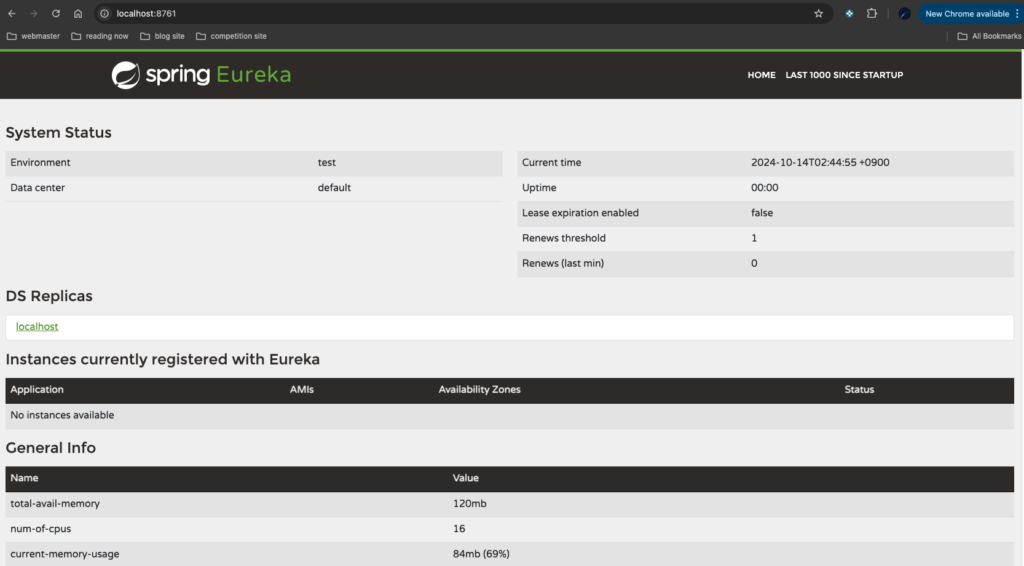
com.netflix.discovery: OFFeurekaサーバーというservice discoveryを作成します。基本的にエントリーポイントにEurekaのアノテーションをつけるだけでEurekaが使えるようになります。下記の通り、webコンソールが使えます。
次にeurekaに登録するeureka clientサービスを作成します。これらはeurekaサーバーの管理対象サービスとなります。
最初にServiceAを作ります。
<?xml version="1.0" encoding="UTF-8"?>
<project xmlns="http://maven.apache.org/POM/4.0.0"
	xmlns:xsi="http://www.w3.org/2001/XMLSchema-instance" xsi:schemaLocation="http://maven.apache.org/POM/4.0.0 https://maven.apache.org/xsd/maven-4.0.0.xsd">
	<modelVersion>4.0.0</modelVersion>
	<parent>
		<groupId>org.springframework.boot</groupId>
		<artifactId>spring-boot-starter-parent</artifactId>
		<version>3.3.4</version>
		<relativePath/>
		<!-- lookup parent from repository -->
	</parent>
	<groupId>com.example.ms</groupId>
	<artifactId>sva</artifactId>
	<version>0.0.1-SNAPSHOT</version>
	<name>sva</name>
	<description>Demo project for Spring Boot Microservice</description>

	<properties>
		<java.version>21</java.version>
	</properties>

	<dependencyManagement>
		<dependencies>
			<dependency>
				<groupId>org.springframework.cloud</groupId>
				<artifactId>spring-cloud-dependencies</artifactId>
				<version>2023.0.3</version>
				<type>pom</type>
				<scope>import</scope>
			</dependency>
		</dependencies>
	</dependencyManagement>

	<dependencies>
		<dependency>
			<groupId>org.springframework.boot</groupId>
			<artifactId>spring-boot-starter-web</artifactId>
		</dependency>
		<!-- https://mvnrepository.com/artifact/org.springframework.cloud/spring-cloud-starter-netflix-eureka-client -->
		<dependency>
			<groupId>org.springframework.cloud</groupId>
			<artifactId>spring-cloud-starter-netflix-eureka-client</artifactId>
		</dependency>
		<dependency>
			<groupId>org.springframework.boot</groupId>
			<artifactId>spring-boot-starter-test</artifactId>
			<scope>test</scope>
		</dependency>
	</dependencies>

	<build>
		<plugins>
			<plugin>
				<groupId>org.springframework.boot</groupId>
				<artifactId>spring-boot-maven-plugin</artifactId>
			</plugin>
		</plugins>
	</build>

</project>
package com.example.ms;
import org.springframework.boot.SpringApplication;
import org.springframework.boot.autoconfigure.SpringBootApplication;
@SpringBootApplication
public class MsaApplication {
public static void main(String[] args) {
SpringApplication.run(MsaApplication.class, args);
}
}package com.example.ms;
import org.springframework.web.bind.annotation.GetMapping;
import org.springframework.web.bind.annotation.RestController;
@RestController
public class SVARestController {
@GetMapping("/hello")
public String hello() {
return "Hello from SVA server.";
}
}spring.application.name=sva
server.port: 8081次にServiceAを呼び出すServiceBを作成します。
<?xml version="1.0" encoding="UTF-8"?>
<project xmlns="http://maven.apache.org/POM/4.0.0" xmlns:xsi="http://www.w3.org/2001/XMLSchema-instance"
	xsi:schemaLocation="http://maven.apache.org/POM/4.0.0 https://maven.apache.org/xsd/maven-4.0.0.xsd">
	<modelVersion>4.0.0</modelVersion>
	<parent>
		<groupId>org.springframework.boot</groupId>
		<artifactId>spring-boot-starter-parent</artifactId>
		<version>3.3.4</version>
		<relativePath/> <!-- lookup parent from repository -->
	</parent>
	<groupId>com.example.ms</groupId>
	<artifactId>svb</artifactId>
	<version>0.0.1-SNAPSHOT</version>
	<name>svb</name>
	<description>Demo project for Spring Boot Microservice</description>

	<properties>
		<java.version>21</java.version>
	</properties>

	<dependencyManagement>
		<dependencies>
			<dependency>
				<groupId>org.springframework.cloud</groupId>
				<artifactId>spring-cloud-dependencies</artifactId>
				<version>2023.0.3</version>
				<type>pom</type>
				<scope>import</scope>
			</dependency>
		</dependencies>
	</dependencyManagement>


	<dependencies>
		<dependency>
			<groupId>org.springframework.boot</groupId>
			<artifactId>spring-boot-starter-web</artifactId>
		</dependency>
		<!-- https://mvnrepository.com/artifact/org.springframework.cloud/spring-cloud-starter-netflix-eureka-client -->
		<dependency>
			<groupId>org.springframework.cloud</groupId>
			<artifactId>spring-cloud-starter-netflix-eureka-client</artifactId>
		</dependency>

		<dependency>
			<groupId>org.springframework.boot</groupId>
			<artifactId>spring-boot-starter-test</artifactId>
			<scope>test</scope>
		</dependency>
	</dependencies>

	<build>
		<plugins>
			<plugin>
				<groupId>org.springframework.boot</groupId>
				<artifactId>spring-boot-maven-plugin</artifactId>
			</plugin>
		</plugins>
	</build>

</project>
spring.application.name=svb
server.port: 8082package com.example.ms;
import org.springframework.boot.SpringApplication;
import org.springframework.boot.autoconfigure.SpringBootApplication;
@SpringBootApplication
public class MsbApplication {
public static void main(String[] args) {
SpringApplication.run(MsbApplication.class, args);
}
}package com.example.ms;
import org.springframework.cloud.client.ServiceInstance;
import org.springframework.cloud.client.discovery.DiscoveryClient;
import org.springframework.web.bind.annotation.GetMapping;
import org.springframework.web.bind.annotation.RestController;
import org.springframework.web.client.RestClient;
@RestController
public class SVBRestController {
private final DiscoveryClient discoveryClient;
private final RestClient restClient;
public SVBRestController(DiscoveryClient discoveryClient, RestClient.Builder restClientBuilder) {
this.discoveryClient = discoveryClient;
restClient = restClientBuilder.build();
}
@GetMapping("helloEureka")
public String greeting() {
ServiceInstance serviceInstance = discoveryClient.getInstances("sva").get(0);
String svaResponse = restClient.get()
.uri(serviceInstance.getUri() + "/hello")
.retrieve().body(String.class);
return svaResponse;
}
}ServiceBの内部ではDiscoveryClientを使用してEurekaに登録されている[sva]というサービスに通信することができます。
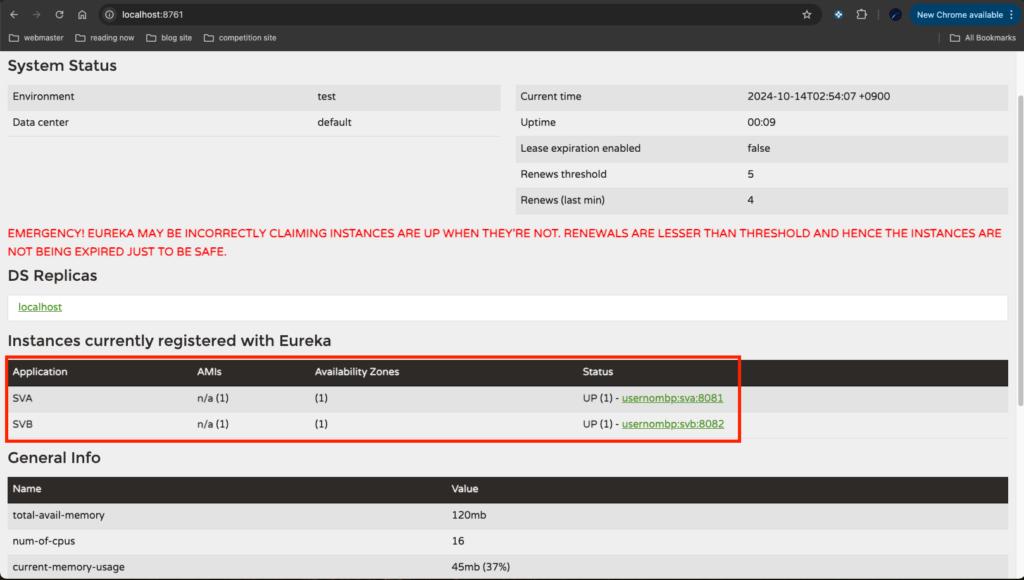
ServiceAとServiceBを起動してEurekaサーバーのWebコンソールを確認すると各サービスがAppとして登録されていることがわかります。
ServiceBに対してリクエストを投げるとServiceAと通信して、ServiceAの戻り値を取得することができます。
curl http://localhost:8082/helloEureka
ServiceDiscoveryを通じて各モジュールに通信できることが確認できました。非常に便利です。
Mircoservice間communicationの振り返り
・RestTemplateを用いたcommunication
別の記事でもやりましたがmysqlを使って簡単なmicroserviceを作成してみます。

dockerでmysqlを立ち上げます。
version: '3'

services:
  mysql_srv:
    image: mysql:latest
    container_name: mysql-container
    ports:
      - 3306:3306
    environment:
      MYSQL_ROOT_PASSWORD: root
      MYSQL_DATABASE: department_db
      MYSQL_USER: user
      MYSQL_PASSWORD: pass
    volumes:
      - ./database/initialize:/docker-entrypoint-initdb.d
      - ./database/config/my.cnf:/etc/mysql/conf.d/my.cnf
dockerで使用するDBを初期化時に作成しておきます。
CREATE DATABASE employee_db;[mysqld]
character-set-server=utf8
collation-server=utf8_general_ci
[client]
default-character-set=utf8下記のコマンドを実行して起動します。テーブルはJavaで使用するJPAが自動で作成してくれるので起動後にやることはありません。
docker compose upDepartmentServiceの作成
departmentServiceを作成します。
<?xml version="1.0" encoding="UTF-8"?>
<project xmlns="http://maven.apache.org/POM/4.0.0"
	xmlns:xsi="http://www.w3.org/2001/XMLSchema-instance" xsi:schemaLocation="http://maven.apache.org/POM/4.0.0 https://maven.apache.org/xsd/maven-4.0.0.xsd">
	<modelVersion>4.0.0</modelVersion>
	<groupId>com.example</groupId>
	<artifactId>department-service</artifactId>
	<version>0.0.1-SNAPSHOT</version>
	<name>department-service</name>
	<description>Demo project for Spring Boot</description>

	<properties>
		<java.version>21</java.version>
		<spring.version>3.3.4</spring.version>
	</properties>
	<dependencies>
		<dependency>
			<groupId>org.springframework.boot</groupId>
			<artifactId>spring-boot-starter</artifactId>
			<version>${spring.version}</version>
		</dependency>
		<dependency>
			<groupId>org.springframework.boot</groupId>
			<artifactId>spring-boot-starter-web</artifactId>
			<version>${spring.version}</version>
		</dependency>
		<dependency>
			<groupId>org.springframework.boot</groupId>
			<artifactId>spring-boot-starter-data-jpa</artifactId>
			<version>${spring.version}</version>
		</dependency>
		<!-- https://mvnrepository.com/artifact/com.mysql/mysql-connector-j -->
		<dependency>
			<groupId>com.mysql</groupId>
			<artifactId>mysql-connector-j</artifactId>
			<version>8.3.0</version>
		</dependency>
		<!-- https://mvnrepository.com/artifact/org.projectlombok/lombok -->
		<dependency>
			<groupId>org.projectlombok</groupId>
			<artifactId>lombok</artifactId>
			<version>1.18.34</version>
			<scope>provided</scope>
		</dependency>
		<!-- https://mvnrepository.com/artifact/jakarta.persistence/jakarta.persistence-api -->
		<dependency>
			<groupId>jakarta.persistence</groupId>
			<artifactId>jakarta.persistence-api</artifactId>
			<version>3.1.0</version>
		</dependency>
		<!-- https://mvnrepository.com/artifact/org.hibernate.orm/hibernate-core -->
		<dependency>
			<groupId>org.hibernate.orm</groupId>
			<artifactId>hibernate-core</artifactId>
			<version>6.6.1.Final</version>
		</dependency>
		<dependency>
			<groupId>org.springframework.boot</groupId>
			<artifactId>spring-boot-starter-test</artifactId>
			<version>${spring.version}</version>
			<scope>test</scope>
		</dependency>
	</dependencies>

	<build>
		<plugins>
			<plugin>
				<groupId>org.springframework.boot</groupId>
				<artifactId>spring-boot-maven-plugin</artifactId>
			</plugin>
		</plugins>
	</build>

</project>
server.port=8081
spring.application.name=department-service
# datasource
spring.datasource.url=jdbc:mysql://localhost:3306/department_db
spring.datasource.username=root
spring.datasource.password=root
spring.jpa.properties.hibernate.dialect=org.hibernate.dialect.MySQLDialect
spring.jpa.hibernate.ddl-auto=update下記のクラス群は同一フォルダで構いません。
package com.example.demo;

import jakarta.persistence.Entity;
import jakarta.persistence.GeneratedValue;
import jakarta.persistence.GenerationType;
import jakarta.persistence.Id;
import jakarta.persistence.Table;
import lombok.AllArgsConstructor;
import lombok.Data;
import lombok.NoArgsConstructor;

@Entity
@Data
@NoArgsConstructor
@AllArgsConstructor
@Table(name="department")
public class Department {

    @Id
    @GeneratedValue(strategy=GenerationType.IDENTITY)
    private Long id;
    private String departmentName;
    private String departmentAddress;
    private String departmentCode;

}
package com.example.demo;
import org.springframework.data.jpa.repository.JpaRepository;
public interface DepartmentRepository extends JpaRepository<Department, Long> {
}package com.example.demo;
public interface DepartmentService {
Department saveDepartment(Department department);
Department getDepartmentById(Long departmentId);
}package com.example.demo;
import org.springframework.stereotype.Service;
import lombok.AllArgsConstructor;
@Service
@AllArgsConstructor
public class DepartmentServiceImpl implements DepartmentService {
private DepartmentRepository departmentRepository;
@Override
public Department saveDepartment(Department department) {
return departmentRepository.save(department);
}
@Override
public Department getDepartmentById(Long departmentId) {
return departmentRepository.findById(departmentId).get();
}
}package com.example.demo;
import org.springframework.http.HttpStatus;
import org.springframework.http.ResponseEntity;
import org.springframework.web.bind.annotation.GetMapping;
import org.springframework.web.bind.annotation.PathVariable;
import org.springframework.web.bind.annotation.PostMapping;
import org.springframework.web.bind.annotation.RequestBody;
import org.springframework.web.bind.annotation.RequestMapping;
import org.springframework.web.bind.annotation.RestController;
import lombok.AllArgsConstructor;
@RestController
@RequestMapping("api/v1/departments")
@AllArgsConstructor
public class DepartmentController {
private DepartmentService departmentService;
@PostMapping
public ResponseEntity<Department> saveDepartment(@RequestBody Department department) {
Department result = departmentService.saveDepartment(department);
return new ResponseEntity<>(result, HttpStatus.CREATED);
}
@GetMapping("{id}")
public ResponseEntity<Department> getDepartmentById(@PathVariable("id") Long departmentId) {
Department result = departmentService.getDepartmentById(departmentId);
return ResponseEntity.ok(result);
}
}package com.example.demo;
import org.springframework.boot.SpringApplication;
import org.springframework.boot.autoconfigure.SpringBootApplication;
@SpringBootApplication
public class DepartmentServiceApplication {
public static void main(String[] args) {
SpringApplication.run(DepartmentServiceApplication.class, args);
}
}上記のクラスを作成後DepartmentServiceApplicationをRunしてServiceを起動します。
下記のリクエストを送信して戻ってくればOKです。
curl -X POST -H "Content-Type: application/json" -d '{"departmentName":"BBUT02","departmentAddress":"TEXAS","departmentCode":"DPT002"}' http://localhost:8081/api/v1/departments{"id":1,"departmentName":"BBUT01","departmentAddress":"CICAGO","departmentCode":"DPT001"}curl -X GET http://localhost:8081/api/v1/departments/1{"id":1,"departmentName":"BBUT01","departmentAddress":"CICAGO","departmentCode":"DPT001"}EmployeeServiceの作成
次にEmployeeServiceを作成します。
<?xml version="1.0" encoding="UTF-8"?>
<project xmlns="http://maven.apache.org/POM/4.0.0" xmlns:xsi="http://www.w3.org/2001/XMLSchema-instance"
	xsi:schemaLocation="http://maven.apache.org/POM/4.0.0 https://maven.apache.org/xsd/maven-4.0.0.xsd">
	<modelVersion>4.0.0</modelVersion>
	<groupId>com.example</groupId>
	<artifactId>employee-service</artifactId>
	<version>0.0.1-SNAPSHOT</version>
	<name>employee-service</name>
	<description>Demo project for Spring Boot</description>

	<properties>
		<java.version>21</java.version>
		<spring.version>3.3.4</spring.version>
	</properties>

	<dependencies>
		<dependency>
			<groupId>org.springframework.boot</groupId>
			<artifactId>spring-boot-starter</artifactId>
			<version>${spring.version}</version>
		</dependency>
		<dependency>
			<groupId>org.springframework.boot</groupId>
			<artifactId>spring-boot-starter-web</artifactId>
			<version>${spring.version}</version>
		</dependency>
		<dependency>
			<groupId>org.springframework.boot</groupId>
			<artifactId>spring-boot-starter-data-jpa</artifactId>
			<version>${spring.version}</version>
		</dependency>
		<!-- https://mvnrepository.com/artifact/com.mysql/mysql-connector-j -->
		<dependency>
			<groupId>com.mysql</groupId>
			<artifactId>mysql-connector-j</artifactId>
			<version>8.3.0</version>
		</dependency>
		<!-- https://mvnrepository.com/artifact/org.projectlombok/lombok -->
		<dependency>
			<groupId>org.projectlombok</groupId>
			<artifactId>lombok</artifactId>
			<version>1.18.34</version>
			<scope>provided</scope>
		</dependency>
		<!-- https://mvnrepository.com/artifact/jakarta.persistence/jakarta.persistence-api -->
		<dependency>
			<groupId>jakarta.persistence</groupId>
			<artifactId>jakarta.persistence-api</artifactId>
			<version>3.1.0</version>
		</dependency>
		<!-- https://mvnrepository.com/artifact/org.hibernate.orm/hibernate-core -->
		<dependency>
			<groupId>org.hibernate.orm</groupId>
			<artifactId>hibernate-core</artifactId>
			<version>6.6.1.Final</version>
		</dependency>
		<dependency>
			<groupId>org.springframework.boot</groupId>
			<artifactId>spring-boot-starter-test</artifactId>
			<version>${spring.version}</version>
			<scope>test</scope>
		</dependency>
	</dependencies>


	<build>
		<plugins>
			<plugin>
				<groupId>org.springframework.boot</groupId>
				<artifactId>spring-boot-maven-plugin</artifactId>
			</plugin>
		</plugins>
	</build>

</project>
server.port=8082
spring.application.name=employee-service
# datasource
spring.datasource.url=jdbc:mysql://localhost:3306/employee_db
spring.datasource.username=root
spring.datasource.password=root
spring.jpa.properties.hibernate.dialect=org.hibernate.dialect.MySQLDialect
spring.jpa.hibernate.ddl-auto=updateEmployeeServiceはDepartmentServiceとcommunicationするのでDTO(Data Transfer Object)を使用して互いに通信します。
package com.example.demo;

import jakarta.persistence.Column;
import jakarta.persistence.Entity;
import jakarta.persistence.GeneratedValue;
import jakarta.persistence.GenerationType;
import jakarta.persistence.Id;
import jakarta.persistence.Table;
import lombok.AllArgsConstructor;
import lombok.Data;
import lombok.NoArgsConstructor;

@Entity
@Data
@NoArgsConstructor
@AllArgsConstructor
@Table(name="users")
public class User {

    @Id
    @GeneratedValue(strategy=GenerationType.IDENTITY)
    private Long id;

    private String firstName;

    private String lastName;

    @Column(nullable=false, unique=true)
    private String email;

    private String departmentId;
}
package com.example.demo;
import lombok.AllArgsConstructor;
import lombok.Data;
import lombok.NoArgsConstructor;
@Data
@NoArgsConstructor
@AllArgsConstructor
public class UserDto {
private Long id;
private String firstName;
private String lastName;
private String email;
}package com.example.demo;
import lombok.AllArgsConstructor;
import lombok.Data;
import lombok.NoArgsConstructor;
@Data
@AllArgsConstructor
@NoArgsConstructor
public class DepartmentDto {
private Long id;
private String departmentName;
private String departmentAddress;
private String departmentCode;
}package com.example.demo;
import lombok.AllArgsConstructor;
import lombok.Data;
import lombok.NoArgsConstructor;
@Data
@NoArgsConstructor
@AllArgsConstructor
public class ResponseDto {
private DepartmentDto departmentDto;
private UserDto userDto;
}package com.example.demo;
import org.springframework.data.jpa.repository.JpaRepository;
public interface UserRepository extends JpaRepository<User, Long> {
}package com.example.demo;
public interface UserService {
User saveUser(User user);
ResponseDto getUser(Long userId);
}package com.example.demo;
import org.springframework.context.annotation.Bean;
import org.springframework.context.annotation.Configuration;
import org.springframework.web.client.RestTemplate;
@Configuration
public class UserAppConfig {
@Bean
public RestTemplate restTemplate() {
return new RestTemplate();
}
}package com.example.demo;
import org.springframework.http.ResponseEntity;
import org.springframework.stereotype.Service;
import org.springframework.web.client.RestTemplate;
import lombok.AllArgsConstructor;
import lombok.extern.slf4j.Slf4j;
@Service
@AllArgsConstructor
@Slf4j
public class UserServiceImpl implements UserService {
private UserRepository userRepository;
private RestTemplate restTemplate;
@Override
public User saveUser(User user) {
return userRepository.save(user);
}
@Override
public ResponseDto getUser(Long userId) {
ResponseDto responseDto = new ResponseDto();
User user = userRepository.findById(userId).get();
UserDto userDto = toUserDto(user);
ResponseEntity<DepartmentDto> responseEntity
= restTemplate.getForEntity("http://localhost:8081/api/v1/departments/"
+ user.getDepartmentId() , DepartmentDto.class);
responseDto.setUserDto(userDto);
responseDto.setDepartmentDto(responseEntity.getBody());
return responseDto;
}
private UserDto toUserDto(User user) {
UserDto userDto = new UserDto();
userDto.setId(user.getId());
userDto.setFirstName(user.getFirstName());
userDto.setLastName(user.getLastName());
userDto.setEmail(user.getEmail());
return userDto;
}
}package com.example.demo;
import org.springframework.http.HttpStatus;
import org.springframework.http.ResponseEntity;
import org.springframework.web.bind.annotation.GetMapping;
import org.springframework.web.bind.annotation.PathVariable;
import org.springframework.web.bind.annotation.PostMapping;
import org.springframework.web.bind.annotation.RequestBody;
import org.springframework.web.bind.annotation.RequestMapping;
import org.springframework.web.bind.annotation.RestController;
import lombok.AllArgsConstructor;
@RestController
@RequestMapping("api/v1/users")
@AllArgsConstructor
public class UserController {
private UserService userService;
@PostMapping
public ResponseEntity<User> saveUser(@RequestBody User user) {
User savedUser = userService.saveUser(user);
return new ResponseEntity<User>(savedUser, HttpStatus.CREATED);
}
@GetMapping("{id}")
public ResponseEntity<ResponseDto> getUser(@PathVariable("id") Long userId) {
ResponseDto responseDto = userService.getUser(userId);
return ResponseEntity.ok(responseDto);
}
}package com.example.demo;
import org.springframework.boot.SpringApplication;
import org.springframework.boot.autoconfigure.SpringBootApplication;
@SpringBootApplication
public class EmployeeServiceApplication {
public static void main(String[] args) {
SpringApplication.run(EmployeeServiceApplication.class, args);
}
}上記を作成したらEmployeeServiceとDepartmentServiceを起動して下記のリクエストを実行します。
curl -X POST -H "Content-Type: application/json" -d '{"firstName":"Kevin","lastName":"Maccoy","email":"kevin.maccoy@gmail.com", "departmentId":"1"}' http://localhost:8082/api/v1/userscurl -X GET http://localhost:8082/api/v1/users/12番目のリクエストは下記のようにresponseが返ってきます。確認できたら動作は問題ありません。
user@usernoMBP restemplate % curl -X GET http://localhost:8082/api/v1/users/2
{"departmentDto":{"id":1,"departmentName":"BBUT01","departmentAddress":"CICAGO","departmentCode":"DPT001"},"userDto":{"id":2,"firstName":"Mcdonald","lastName":"Happyset","email":"mac.happy@gmail.com"}}%
・WebClientを用いたcommunication
次にwebclientを作成します。内容は先ほどのresttemplateと同じです。
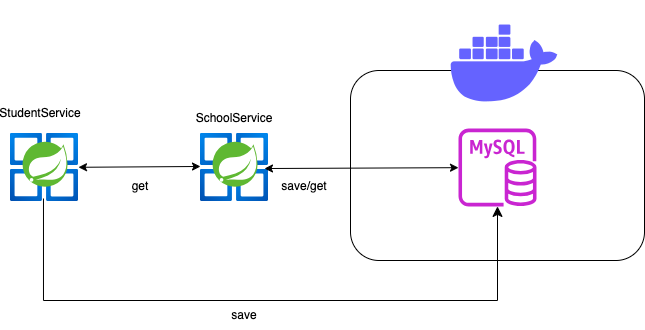
SchoolServiceの作成
docker(mysql)を作成します。
version: '3'

services:
  mysql_srv:
    image: mysql:latest
    container_name: mysql-container
    ports:
      - 3306:3306
    environment:
      MYSQL_ROOT_PASSWORD: root
      MYSQL_DATABASE: school_db
      MYSQL_USER: user
      MYSQL_PASSWORD: pass
    volumes:
      - ./database/initialize:/docker-entrypoint-initdb.d
      - ./database/config/my.cnf:/etc/mysql/conf.d/my.cnf
CREATE DATABASE student_db;[mysqld]
character-set-server=utf8
collation-server=utf8_general_ci
[client]
default-character-set=utf8次にjavaクラスを作成します。
<?xml version="1.0" encoding="UTF-8"?>
<project xmlns="http://maven.apache.org/POM/4.0.0"
	xmlns:xsi="http://www.w3.org/2001/XMLSchema-instance" xsi:schemaLocation="http://maven.apache.org/POM/4.0.0 https://maven.apache.org/xsd/maven-4.0.0.xsd">
	<modelVersion>4.0.0</modelVersion>
	<groupId>com.example</groupId>
	<artifactId>school-service</artifactId>
	<version>0.0.1-SNAPSHOT</version>
	<name>school-service</name>
	<description>Demo project for Spring Boot</description>

	<properties>
		<java.version>21</java.version>
		<spring.version>3.3.4</spring.version>
	</properties>

	<dependencies>
		<dependency>
			<groupId>org.springframework.boot</groupId>
			<artifactId>spring-boot-starter</artifactId>
			<version>${spring.version}</version>
		</dependency>
		<dependency>
			<groupId>org.springframework.boot</groupId>
			<artifactId>spring-boot-starter-web</artifactId>
			<version>${spring.version}</version>
		</dependency>
		<dependency>
			<groupId>org.springframework.boot</groupId>
			<artifactId>spring-boot-starter-data-jpa</artifactId>
			<version>${spring.version}</version>
		</dependency>
		<dependency>
			<groupId>org.springframework.boot</groupId>
			<artifactId>spring-boot-starter-webflux</artifactId>
			<version>${spring.version}</version>
		</dependency>
		<dependency>
			<groupId>com.mysql</groupId>
			<artifactId>mysql-connector-j</artifactId>
			<version>8.3.0</version>
		</dependency>
		<dependency>
			<groupId>org.projectlombok</groupId>
			<artifactId>lombok</artifactId>
			<version>1.18.34</version>
			<scope>provided</scope>
		</dependency>
		<dependency>
			<groupId>jakarta.persistence</groupId>
			<artifactId>jakarta.persistence-api</artifactId>
			<version>3.1.0</version>
		</dependency>
		<dependency>
			<groupId>org.hibernate.orm</groupId>
			<artifactId>hibernate-core</artifactId>
			<version>6.6.1.Final</version>
		</dependency>
		<!-- TEST -->
		<dependency>
			<groupId>org.springframework.boot</groupId>
			<artifactId>spring-boot-starter-test</artifactId>
			<version>${spring.version}</version>
			<scope>test</scope>
		</dependency>
	</dependencies>

	<build>
		<plugins>
			<plugin>
				<groupId>org.springframework.boot</groupId>
				<artifactId>spring-boot-maven-plugin</artifactId>
			</plugin>
		</plugins>
	</build>

</project>
server.port=8081
spring.application.name=school-service
# datasource
spring.datasource.url=jdbc:mysql://localhost:3306/school_db
spring.datasource.username=root
spring.datasource.password=root
spring.jpa.properties.hibernate.dialect=org.hibernate.dialect.MySQLDialect
spring.jpa.hibernate.ddl-auto=updatepackage com.example.demo;
import jakarta.persistence.Entity;
import jakarta.persistence.GeneratedValue;
import jakarta.persistence.GenerationType;
import jakarta.persistence.Id;
import jakarta.persistence.Table;
import lombok.AllArgsConstructor;
import lombok.Data;
import lombok.NoArgsConstructor;
@Entity
@Data
@NoArgsConstructor
@AllArgsConstructor
@Table(name="t_school_class")
public class SchoolClass {
@Id
@GeneratedValue(strategy=GenerationType.IDENTITY)
private Long id;
private String classGrade;
private String classRank;
private String classTeacher;
private String classSubject;
}package com.example.demo;
import org.springframework.data.jpa.repository.JpaRepository;
public interface SchoolClassRepository extends JpaRepository<SchoolClass, Long> {
}package com.example.demo;
public interface SchoolClassService {
SchoolClass saveSchoolClass(SchoolClass schoolClass);
SchoolClass getSchoolClass(Long classId);
}package com.example.demo;
import org.springframework.stereotype.Service;
import lombok.AllArgsConstructor;
@Service
@AllArgsConstructor
public class SchoolClassServiceImpl implements SchoolClassService {
private SchoolClassRepository schoolClassRepository;
@Override
public SchoolClass saveSchoolClass(SchoolClass schoolClass) {
return schoolClassRepository.save(schoolClass);
}
@Override
public SchoolClass getSchoolClass(Long classId) {
return schoolClassRepository.findById(classId).get();
}
}package com.example.demo;
import org.springframework.http.HttpStatus;
import org.springframework.http.ResponseEntity;
import org.springframework.web.bind.annotation.GetMapping;
import org.springframework.web.bind.annotation.PathVariable;
import org.springframework.web.bind.annotation.PostMapping;
import org.springframework.web.bind.annotation.RequestBody;
import org.springframework.web.bind.annotation.RequestMapping;
import org.springframework.web.bind.annotation.RestController;
import lombok.AllArgsConstructor;
@RestController
@RequestMapping("api/v1/school-classes")
@AllArgsConstructor
public class SchoolController {
private SchoolClassService schoolClassService;
@PostMapping
public ResponseEntity<SchoolClass> saveSchoolClass(@RequestBody SchoolClass schoolClass) {
SchoolClass result = schoolClassService.saveSchoolClass(schoolClass);
return new ResponseEntity<SchoolClass>(result, HttpStatus.CREATED);
}
@GetMapping("{id}")
public ResponseEntity<SchoolClass> getSchoolClassById(@PathVariable("id") Long classId) {
SchoolClass result = schoolClassService.getSchoolClass(classId);
return ResponseEntity.ok(result);
}
}package com.example.demo;
import org.springframework.boot.SpringApplication;
import org.springframework.boot.autoconfigure.SpringBootApplication;
@SpringBootApplication
public class SchoolServiceApplication {
public static void main(String[] args) {
SpringApplication.run(SchoolServiceApplication.class, args);
}
}上記を作成したらビルドして実行します。下記のコマンドを実行してレスポンスが返ってきたらOKです。
curl -X POST -H "Content-Type: application/json" -d '{"classGrade":"Elementary","classRank":"5th","classTeacher":"David Jackson","classSubject":"mathmatics"}' http://localhost:8081/api/v1/school-classes
curl -X POST -H "Content-Type: application/json" -d '{"classGrade":"Elementary","classRank":"3th","classTeacher":"Mary Atkinson","classSubject":"phylosophy"}' http://localhost:8081/api/v1/school-classes
curl -X GET http://localhost:8081/api/v1/school-classes/1
StudentServiceの作成
Javaクラスは下記の通りです。
<?xml version="1.0" encoding="UTF-8"?>
<project xmlns="http://maven.apache.org/POM/4.0.0" xmlns:xsi="http://www.w3.org/2001/XMLSchema-instance"
	xsi:schemaLocation="http://maven.apache.org/POM/4.0.0 https://maven.apache.org/xsd/maven-4.0.0.xsd">
	<modelVersion>4.0.0</modelVersion>
	<groupId>com.example</groupId>
	<artifactId>student-service</artifactId>
	<version>0.0.1-SNAPSHOT</version>
	<name>student-service</name>
	<description>Demo project for Spring Boot</description>

	<properties>
		<java.version>21</java.version>
		<spring.version>3.3.4</spring.version>
	</properties>

	<dependencies>
		<dependency>
			<groupId>org.springframework.boot</groupId>
			<artifactId>spring-boot-starter</artifactId>
			<version>${spring.version}</version>
		</dependency>
		<dependency>
			<groupId>org.springframework.boot</groupId>
			<artifactId>spring-boot-starter-web</artifactId>
			<version>${spring.version}</version>
		</dependency>
		<dependency>
			<groupId>org.springframework.boot</groupId>
			<artifactId>spring-boot-starter-data-jpa</artifactId>
			<version>${spring.version}</version>
		</dependency>
		<dependency>
			<groupId>org.springframework.boot</groupId>
			<artifactId>spring-boot-starter-webflux</artifactId>
			<version>${spring.version}</version>
		</dependency>
		<dependency>
			<groupId>com.mysql</groupId>
			<artifactId>mysql-connector-j</artifactId>
			<version>8.3.0</version>
		</dependency>
		<dependency>
			<groupId>org.projectlombok</groupId>
			<artifactId>lombok</artifactId>
			<version>1.18.34</version>
			<scope>provided</scope>
		</dependency>
		<dependency>
			<groupId>jakarta.persistence</groupId>
			<artifactId>jakarta.persistence-api</artifactId>
			<version>3.1.0</version>
		</dependency>
		<dependency>
			<groupId>org.hibernate.orm</groupId>
			<artifactId>hibernate-core</artifactId>
			<version>6.6.1.Final</version>
		</dependency>
		<!-- TEST -->
		<dependency>
			<groupId>org.springframework.boot</groupId>
			<artifactId>spring-boot-starter-test</artifactId>
			<version>${spring.version}</version>
			<scope>test</scope>
		</dependency>
	</dependencies>

	<build>
		<plugins>
			<plugin>
				<groupId>org.springframework.boot</groupId>
				<artifactId>spring-boot-maven-plugin</artifactId>
			</plugin>
		</plugins>
	</build>

</project>
server.port=8082
spring.application.name=student-service
# datasource
spring.datasource.url=jdbc:mysql://localhost:3306/student_db
spring.datasource.username=root
spring.datasource.password=root
spring.jpa.properties.hibernate.dialect=org.hibernate.dialect.MySQLDialect
spring.jpa.hibernate.ddl-auto=updatepackage com.example.demo;
import org.springframework.context.annotation.Bean;
import org.springframework.context.annotation.Configuration;
import org.springframework.web.reactive.function.client.WebClient;
@Configuration
public class AppConfig {
@Bean
public WebClient webClient() {
return WebClient.builder().build();
}
}package com.example.demo;
import jakarta.persistence.Column;
import jakarta.persistence.Entity;
import jakarta.persistence.GeneratedValue;
import jakarta.persistence.GenerationType;
import jakarta.persistence.Id;
import jakarta.persistence.Table;
import lombok.AllArgsConstructor;
import lombok.Data;
import lombok.NoArgsConstructor;
@Entity
@Data
@AllArgsConstructor
@NoArgsConstructor
@Table(name="t_student")
public class Student {
@Id
@GeneratedValue(strategy=GenerationType.IDENTITY)
private Long id;
@Column(nullable=false)
private String firstName;
@Column(nullable=false)
private String lastName;
private Long classId;
private String studentGrade;
}package com.example.demo;
import lombok.AllArgsConstructor;
import lombok.Data;
import lombok.NoArgsConstructor;
@Data
@AllArgsConstructor
@NoArgsConstructor
public class StudentDto {
private Long id;
private String firstName;
private String lastName;
private Long classId;
private String studentGrade;
}package com.example.demo;
import lombok.AllArgsConstructor;
import lombok.Data;
import lombok.NoArgsConstructor;
@Data
@AllArgsConstructor
@NoArgsConstructor
public class SchoolClassDto {
private Long id;
private String classGrade;
private String classRank;
private String classTeacher;
private String classSubject;
}package com.example.demo;
import lombok.AllArgsConstructor;
import lombok.Data;
import lombok.NoArgsConstructor;
@Data
@AllArgsConstructor
@NoArgsConstructor
public class ResponseDto {
private SchoolClassDto schoolClassDto;
private StudentDto studentDto;
}package com.example.demo;
import org.springframework.data.jpa.repository.JpaRepository;
public interface StudentRepository extends JpaRepository<Student, Long> {
}package com.example.demo;
public interface StudentService {
Student saveStudent(Student student);
ResponseDto getStudent(Long studentId);
}package com.example.demo;
import org.springframework.stereotype.Service;
import org.springframework.web.reactive.function.client.WebClient;
import lombok.AllArgsConstructor;
import lombok.extern.slf4j.Slf4j;
@Service
@AllArgsConstructor
@Slf4j
public class StudentServiceImpl implements StudentService {
private WebClient webClient;
private StudentRepository studentRepository;
@Override
public Student saveStudent(Student student) {
return studentRepository.save(student);
}
@Override
public ResponseDto getStudent(Long studentId) {
Student student = studentRepository.findById(studentId).get();
StudentDto studentDto = toStudentDto(student);
SchoolClassDto schoolClassDto = webClient.get()
.uri("http://localhost:8081/api/v1/school-classes/" + student.getClassId())
.retrieve().bodyToMono(SchoolClassDto.class)
.block();
return new ResponseDto(schoolClassDto, studentDto);
}
private StudentDto toStudentDto(Student student) {
return new StudentDto(
student.getId(),
student.getFirstName(),
student.getLastName(),
student.getClassId(),
student.getStudentGrade()
);
}
}package com.example.demo;
import org.springframework.http.HttpStatus;
import org.springframework.http.ResponseEntity;
import org.springframework.web.bind.annotation.GetMapping;
import org.springframework.web.bind.annotation.PathVariable;
import org.springframework.web.bind.annotation.PostMapping;
import org.springframework.web.bind.annotation.RequestBody;
import org.springframework.web.bind.annotation.RequestMapping;
import org.springframework.web.bind.annotation.RestController;
import lombok.AllArgsConstructor;
@RestController
@RequestMapping("api/v1/students")
@AllArgsConstructor
public class StudentController {
private StudentService studentService;
@PostMapping
public ResponseEntity<Student> saveStudent(@RequestBody Student student) {
Student savedStudent = studentService.saveStudent(student);
return new ResponseEntity<>(savedStudent, HttpStatus.CREATED);
}
@GetMapping("{id}")
public ResponseEntity<ResponseDto> getStudent(@PathVariable("id") Long studentId) {
ResponseDto responseDto = studentService.getStudent(studentId);
return ResponseEntity.ok(responseDto);
}
}package com.example.demo;
import org.springframework.boot.SpringApplication;
import org.springframework.boot.autoconfigure.SpringBootApplication;
@SpringBootApplication
public class StudentServiceApplication {
public static void main(String[] args) {
SpringApplication.run(StudentServiceApplication.class, args);
}
}上記のクラスを作成後に下記のリクエストを実行してレスポンスが返ってきたらOKです。
curl -X POST -H "Content-Type: application/json" -d '{"firstName":"Michael","lastName":"Chevoler","classId":"1", "studentGrade":"Good"}' http://localhost:8082/api/v1/students
curl -X POST -H "Content-Type: application/json" -d '{"firstName":"Sara","lastName":"Samantha","classId":"2", "studentGrade":"Good Enough"}' http://localhost:8082/api/v1/students
curl -X GET http://localhost:8082/api/v1/students/1
curl -X GET http://localhost:8082/api/v1/students/2
user@usernoMBP webclient % curl -X POST -H "Content-Type: application/json" -d '{"firstName":"Sara","lastName":"Samantha","classId":"2", "studentGrade":"Good Enough"}' http://localhost:8082/api/v1/students
{"id":2,"firstName":"Sara","lastName":"Samantha","classId":2,"studentGrade":"Good Enough"}% user@usernoMBP webclient % curl -X GET http://localhost:8082/api/v1/students/1
{"schoolClassDto":{"id":1,"classGrade":"Elementary","classRank":"5th","classTeacher":"David Jackson","classSubject":"mathmatics"},"studentDto":{"id":1,"firstName":"Michael","lastName":"Chevoler","classId":1,"studentGrade":"Good"}}% user@usernoMBP webclient % curl -X GET http://localhost:8082/api/v1/students/2
{"schoolClassDto":{"id":2,"classGrade":"Elementary","classRank":"3th","classTeacher":"Mary Atkinson","classSubject":"phylosophy"},"studentDto":{"id":2,"firstName":"Sara","lastName":"Samantha","classId":2,"studentGrade":"Good Enough"}}% user@usernoMBP webclient % ・Spring Cloud Open Feignを使用してcommunicationする
・Appendix
参考文献はこちら
https://spring.io/guides/gs/service-registration-and-discovery
https://spring.io/guides/gs/service-registration-and-discovery
https://note.com/commonerd/n/nb5e1fec7b34a
コメントを残す